

You pull out your dining chair to sit down, and the whole thing rocks side to side like a boat in choppy water. You shift your weight and the wobble gets worse. Sound familiar?
A wobbly chair is one of the most annoying — and surprisingly common — home problems. The good news is that in most cases, you don’t need to throw it out or call a professional. With a few basic tools and the right approach, you can fix a wobbly chair yourself in an afternoon.
This guide walks you through everything you need to know, from diagnosing why your chair wobbles to fixing it step by step. Whether your chair has loose joints, uneven legs, or is just fighting an uneven floor, there’s a solution here for you.
Why Do Chairs Get Wobbly in the First Place?
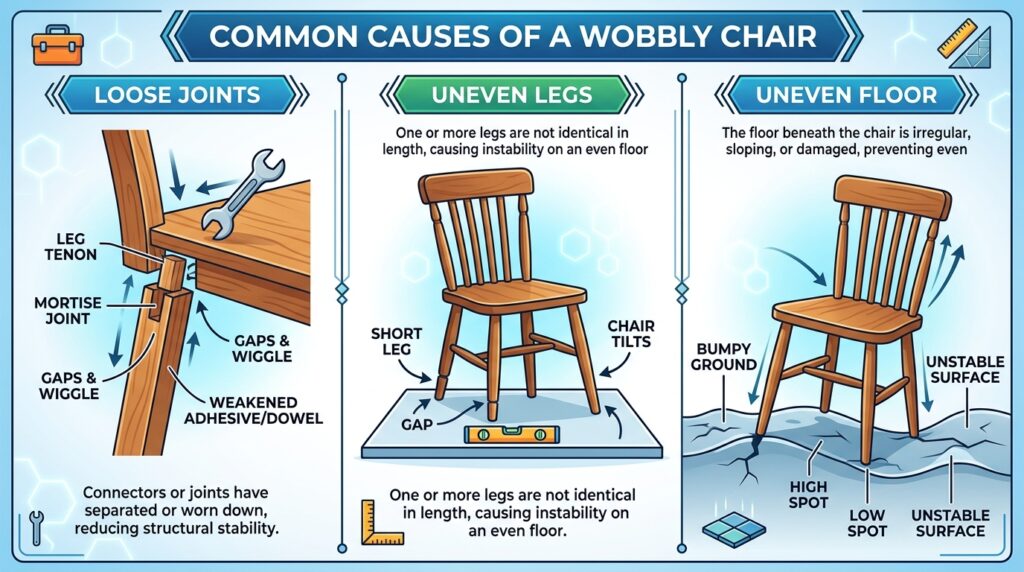
Before diving into repairs, it helps to understand what’s actually causing the wobble. Most wobbly chairs fall into one of three categories.
1. Loose or Failed Glue Joints
Over time, nuts, bolts, and screws can loosen, leading to instability. Loose joints between legs and seat frames are one of the most common causes of a wobbly chair.
Wooden chair joints — especially the mortise-and-tenon type — are held together almost entirely by wood glue. Constant stress and overloading of joints from pulling out and replacing chairs from tables, the shifting of heavy human frames, and even occasional rocking on the back legs can cause loosening and eventual failure of joints.
When that glue breaks down over years of use, the joint starts to flex, and the wobble begins.
2. Uneven or Shortened Legs
Uneven chair legs are a common issue — furniture legs become unstable due to wear, floor irregularities, or manufacturing flaws.
Sometimes one leg simply wears down faster than the others, or a small manufacturing inconsistency means the chair never sat perfectly level from day one.
3. The Floor, Not the Chair
This one surprises a lot of people. The first thing to do is check your floor, as the issue may not actually be with the furniture itself. To check if the floor is the culprit, try moving the furniture to a different location in the room.
In older homes especially, floors settle and shift over time. If your chair is perfectly stable in one spot but wobbles in another, the floor is the likely culprit.
What Tools and Materials Do You Need?
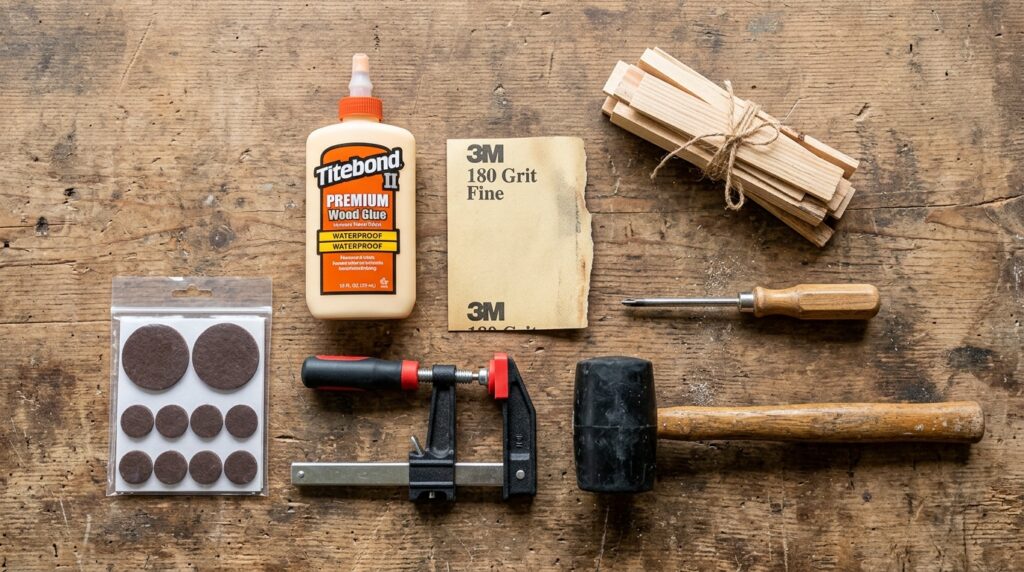
You don’t need a fully kitted-out workshop to fix a wobbly chair. Here’s a simple list of what you might need, depending on the repair:
| Item | Purpose |
|---|---|
| Wood glue (PVA or hide glue) | Re-bonding loose joints |
| Bar or band clamps | Holding joints while glue dries |
| Screwdriver (flathead and Phillips) | Tightening hardware |
| Rubber mallet or deadblow hammer | Knocking joints apart gently |
| Sandpaper (medium and fine grit) | Cleaning old glue from surfaces |
| Wood shims or felt pads | Leveling uneven legs |
| L-brackets (optional) | Reinforcing structural weak points |
| Epoxy filler (optional) | Filling damaged or gapped joints |
Not every repair needs all of these. Start by diagnosing the problem, then gather only what you need.
Step 1 — Diagnose the Wobble
Never skip the diagnosis step. Jumping straight into repairs without knowing the actual cause often wastes time — and can make things worse.
Begin by applying moderate, lateral pressure to the frame, systematically testing each leg and joint for movement. Use a strong flashlight to inspect wood components closely for hairline cracks, especially near stress points. Check the tightness of any visible screws or bolts, as loose hardware can mimic structural failure.
Here’s a simple way to pinpoint the problem:
- Place the chair on a flat, hard floor.
- Push gently on each leg and corner of the seat frame.
- Note exactly which joint, leg, or area has the most movement.
- Try rocking the chair diagonally — front-left to back-right, then front-right to back-left.
If all four legs touch the floor evenly but the chair still wobbles, the issue is almost certainly in the joints. If one leg is clearly shorter or doesn’t touch the floor, that’s an uneven leg problem.
Step 2 — Tighten Any Loose Screws or Hardware First
Before breaking out the wood glue, check all the hardware. Some chairs — especially modern flat-pack or mass-produced styles — are assembled with screws and bolts rather than traditional glue joints.
Flip the chair upside down and inspect all connection points. Tighten any loose screws or bolts that secure the wobbly leg to the frame with a screwdriver or wrench. Ensure that they are securely fastened, but be cautious not to over-tighten, as doing so could damage the wood or threads.
For metal-framed chairs, applying a liquid threadlocker compound to the bolt threads before reassembly can prevent them from vibrating loose again over time.
Once you’ve tightened everything, sit in the chair and test. If the wobble is gone, you’re done. If it persists, move on to the next steps.
Step 3 — Re-Gluing Loose Wood Joints

This is the most common and most effective fix for a wobbly wooden chair. The most common repair for a wobbly wooden chair involves disassembling, cleaning, and re-gluing the loose joints, which fail when the original glue bond deteriorates.
How to Re-Glue a Chair Joint
A. Knock the joint apart (if possible)
Use a rubber mallet or deadblow hammer to gently separate the loose joint. Work slowly and avoid forcing it — if the joint resists, there may still be some holding power in the old glue.
Remove all screws and nails before hammering the legs apart. Even when you think you’ve found them all, it’s worth double-checking. Use a small flat-head screwdriver to separate stubborn nails.
B. Clean the old glue off completely
This step is crucial and often skipped. To achieve success gluing wood parts together, each part must be clean and you must achieve tight wood-to-wood contact. You will need to remove the old glue first.
Sand or scrape the old adhesive from both the tenon (the peg) and the mortise (the hole). The goal is to get back to bare wood on both surfaces. When gluing up chair parts they have to be absolutely clean, as most wood glue will only stick to bare wood. If there is any finish or old glue in the joint, the new glue won’t stick.
C. Apply glue evenly to both surfaces
The glue needs to be spread evenly on all sides of the tenon and the mortise. Using an artist’s brush is recommended — they are the best tool for getting in the nooks and crannies and making sure the glue is spread everywhere. Don’t be tempted to use your finger to spread the glue. The oils on your fingers can weaken the glue.
D. Clamp and let it cure
Insert the components and secure them with clamps, applying enough pressure to fully close the joint and generate a slight bead of squeeze-out. Avoid over-tightening, as too much pressure can starve the joint of glue, resulting in a weaker connection. Allow the glue to cure completely, typically for 24 hours, before removing the clamps and using the chair.
Expert Tip: Use a band clamp (also called a strap clamp) for chairs — it wraps around the entire frame and applies even pressure to all four legs at once, which is far better than multiple bar clamps pulling unevenly.
Choosing the Right Glue for Chair Repair
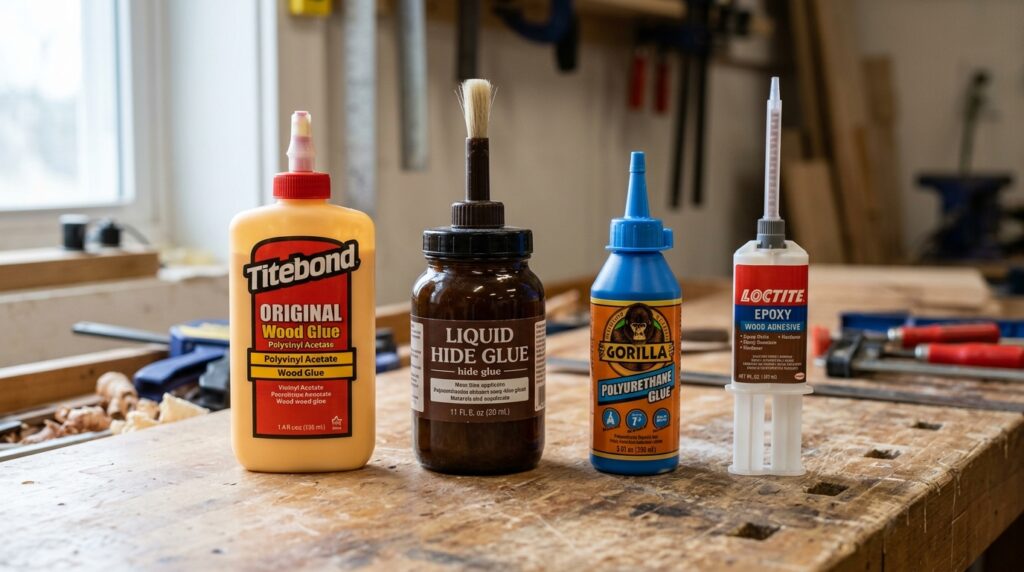
Not all wood glues are the same, and picking the wrong one can mean redoing the job in a year. Here’s a breakdown:
PVA Wood Glue (Yellow or White Glue)
This is the most common type of wood glue for general indoor furniture repair. Pros: non-toxic, easy water cleanup while wet, relatively inexpensive, and a strong bond for well-fitting joints. Standard PVA isn’t waterproof and has limited gap-filling ability.
Best for: indoor chairs with tight-fitting joints.
Hide Glue
Hide glue is used when doing furniture restoration. It can be reactivated and loosened up by warming it up, making it ideal for antiques. It is the original type of glue used for making chairs over the centuries.
Best for: antique chairs and restoration work.
Polyurethane Glue
Polyurethane glue would be used if repairing outdoor furniture. It is a waterproof glue that will withstand outdoor elements.
Best for: patio chairs or chairs in high-humidity spaces.
Epoxy
Epoxy is the best gap-filler. If your joints aren’t perfectly tight, epoxy can bridge small gaps without sacrificing strength.
Polyurethane glue or a two-part epoxy is an alternative if joints are slightly loose or gapped, as these offer superior gap-filling capability.
Best for: joints that are too worn or damaged to fit tightly anymore.
Step 4 — Fixing Uneven Chair Legs
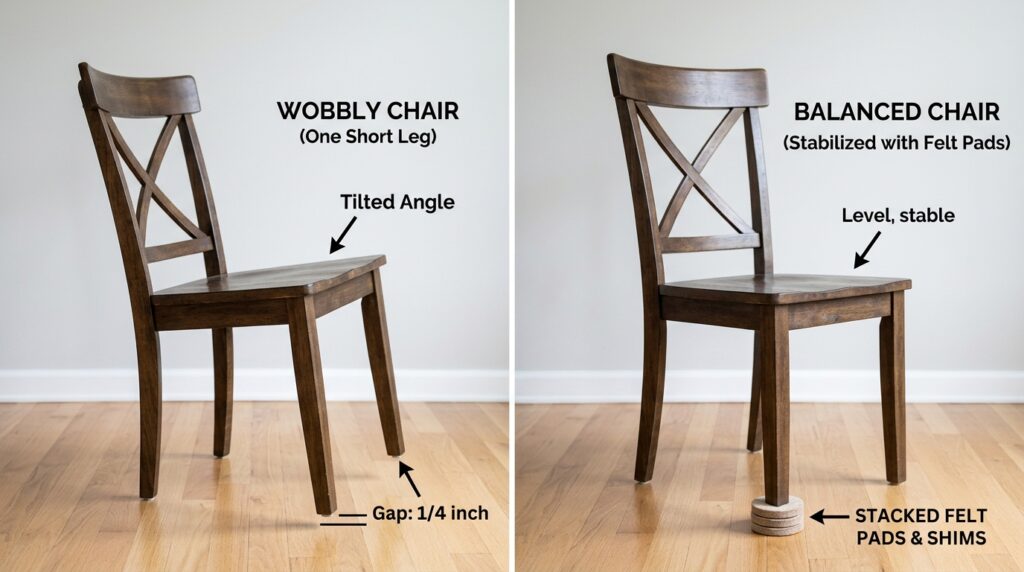
If the joints are solid but the chair still rocks, the problem is the leg length. Here are three practical ways to fix it.
Option A — Felt Pads or Furniture Glides
This is the fastest and easiest solution. Simply attach felt pads or plastic glides to the bottom of the shorter leg. Experiment with different thicknesses until the chair is stable. These pads also protect your floors from scratches.
You can find self-adhesive furniture felt pads at any hardware store. Stack them in layers until the chair sits level.
Option B — Wood Shims
Lift the chair slightly to relieve the weight from the uneven leg, then place a shim or folded piece of cardboard under the shorter leg. Add or remove shims as needed until the chair is level and no longer wobbles.
For a more permanent fix, use a wood shim cut to the right size and glue it to the bottom of the short leg.
Option C — Leg Levelers (Adjustable Furniture Feet)
To install a furniture leg adjuster, carefully turn the chair on its side, then attach the adjuster to the bottom of the leg. Test the chair’s stability by sitting and rocking gently, and adjust as needed.
These are especially useful if you move the chair between rooms with different flooring types.
Option D — Shaving Down a Leg (Advanced)
If one leg is noticeably longer than the others, you can trim it down. This is a more advanced fix best done with a hand plane or belt sander. Mark a level line using a speed square, then sand or plane down the long leg gradually, testing as you go.
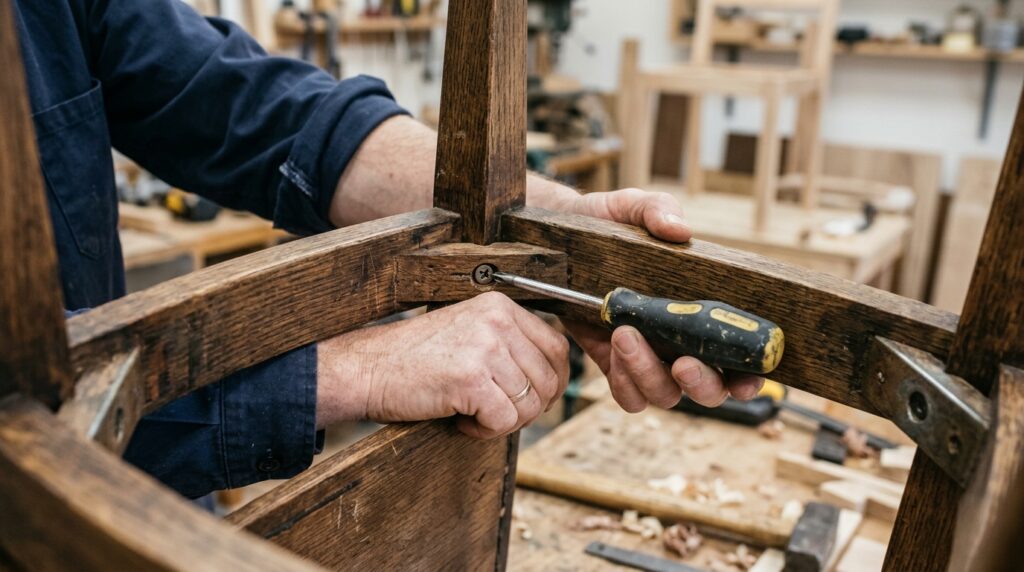
Step 5 — Reinforcing Weak Joints with L-Brackets
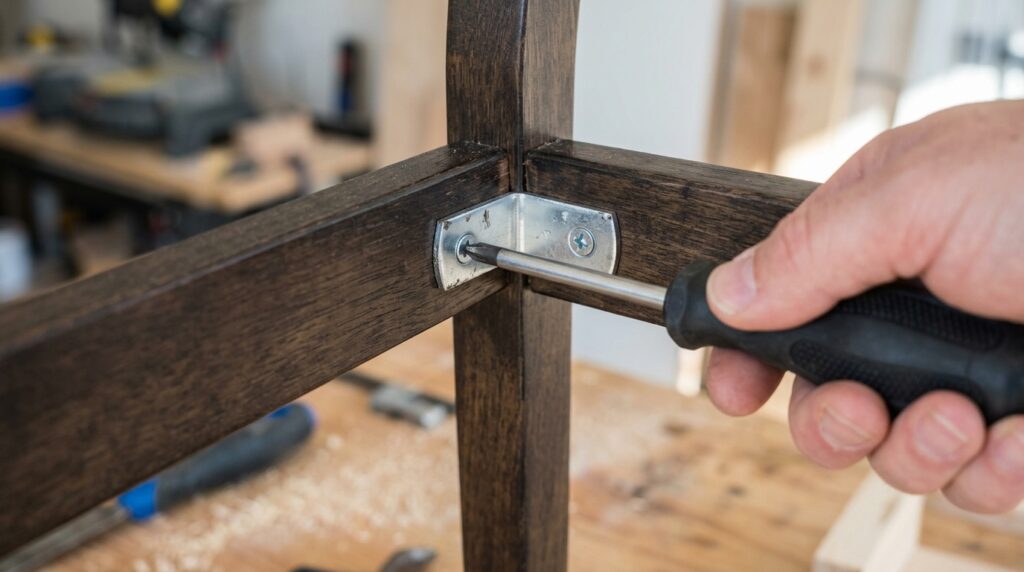
Sometimes a joint is too far gone for glue alone to fix. In those cases, adding a small metal L-bracket gives the joint mechanical reinforcement that glue alone can’t provide.
Position an L-bracket as if it will brace the leg to the frame of the chair. Mark the exact outline of the bracket, taking extra care when marking the center holes where your screws will hold the brace in place.
This method works well on the inside corners of chair seat frames where the legs connect, and it’s a good option when you want a more permanent solution without fully disassembling the chair.
Step 6 — When Glue Injection Is the Better Option

Not every wobble requires you to take the whole chair apart. If the joint is only slightly loose and it would be risky or difficult to disassemble, you can inject glue directly into the joint.
The revised treatment approach required no dismantling of the chairs at all. For each chair, the loose joints were carefully identified by working around each joint and attempting to move it carefully, then glue was injected without taking anything apart. The result was very successful — the chairs were once again solid and sturdy with no racking and movement in the joints.
Use a syringe or a squeeze bottle with a narrow tip. Work the joint slightly open if possible, inject the glue, close the joint firmly, clamp it, and let it dry for 24 hours.
Step 7 — Reassembly Tips to Make the Repair Last
Once the glue is dry and the chair is back together, there are a few things you can do to make sure the repair holds long term.
Label every part before disassembly to make reassembly as stress-free as possible. The rails on a Windsor chair are seated at an angle, and they’ll need to be at the same angle during reassembly.
Here are some reassembly best practices:
- Work on one section at a time — glue the legs first, let them cure, then attach the back.
- Apply clamps evenly without over-tightening.
- Wipe off any squeeze-out (excess glue) with a damp cloth before it dries.
- Allow the full 24-hour cure time before sitting in the chair — even if the glue feels firm sooner.
- Check all four legs are flat on the floor before the glue sets.
How to Prevent Your Chair from Getting Wobbly Again
Fixing a wobbly chair is satisfying. Keeping it fixed is even better. Here’s how to extend the life of your chair joints:
- Check hardware seasonally. Tighten any loose screws or bolts every few months, especially on chairs that get heavy daily use.
- Avoid rocking. Leaning back on two legs is one of the fastest ways to stress and loosen chair joints.
- Control humidity. Wood expands and contracts with humidity changes. Keeping humidity levels in your home consistent helps prevent warping. A humidifier or dehumidifier can help as needed.
- Use felt pads. Even on level floors, felt pads reduce friction and wear on the leg bottoms.
- Don’t ignore early wobbling. A small wobble caught early is a 15-minute fix. Left alone, it turns into a full disassembly job — or a broken chair.
Expert Tips Section
Tip 1 — Clean beats new glue every time. No amount of fresh glue will bond properly over old, dried glue. Taking the extra time to scrape and sand joints clean is the single biggest factor in how long your repair lasts.
Tip 2 — Use hide glue on antiques. Hide glue is preferred for antique chairs because of the heat and wetness — the new glue dissolves the old and the two become one, saving you the step of completely removing the old adhesive.
Tip 3 — Label everything before disassembly. Even if a chair looks symmetrical, the legs and rungs are often slightly different. Labeling each piece ensures everything goes back in exactly the right place and at the right angle.
Tip 4 — Don’t rush the cure time. Wood glue reaches its full strength after 24 hours, not the 30 minutes it takes to feel solid. Using a chair before the glue is fully cured is one of the most common reasons repairs fail quickly.
Tip 5 — When in doubt, use a strap clamp. A strap clamp (band clamp) is designed for chair repairs. It wraps around the entire frame and applies balanced pressure in a way that individual bar clamps simply can’t match.
Wobbly Chair Repair: Pros and Cons of DIY vs. Professional
| DIY Repair | Professional Repair | |
|---|---|---|
| Cost | Low ($5–$30 in materials) | Higher ($50–$200+) |
| Time | 1–3 hours + drying time | Drop-off and wait |
| Skill needed | Beginner to intermediate | None (they handle it) |
| Best for | Common loose joints, uneven legs | Antiques, complex damage, valuable pieces |
| Risk | Low if done carefully | Minimal |
For most everyday chairs, DIY is absolutely the right call. For antique or heirloom pieces, consider consulting a furniture conservator before attempting repairs yourself.
FAQs: How to Fix a Wobbly Chair
Can I fix a wobbly chair without taking it apart?
Yes, in many cases. If the joint is only slightly loose, you can inject wood glue into the gap using a syringe, close the joint, and clamp it. This works well when full disassembly would be difficult or risky.
How long does wood glue take to dry on a chair repair?
Most PVA wood glues are dry enough to remove clamps after 30 to 60 minutes, but full curing takes 24 hours. Most wood glues need clamping for at least 30–60 minutes, but full curing may take 12–24 hours depending on the adhesive. Always wait the full cure time before sitting in the chair.
Why does my new chair wobble?
Even quality furniture can have slight inconsistencies in joint angles or leg lengths that can cause misalignment or imbalance — especially when combined with uneven floors. In older homes, floors can shift or settle over time creating slightly uneven surfaces. Try moving the chair to a different spot to rule out the floor as the cause.
What is the best glue to use for a wobbly wooden chair?
For most indoor chairs with tight-fitting joints, standard PVA wood glue (like Titebond II) works very well. If joints are gapped or damaged, a two-part epoxy gives better gap-filling strength. For antique chairs, hide glue is the traditional and preferred choice.
Can a wobbly chair be dangerous?
Yes. Wobbly furniture poses a safety risk. An unstable chair or table can collapse, potentially causing injuries or damage to your belongings. Ignoring wobbly furniture can lead to further damage over time, with loose joints causing irreparable harm and making it costlier to repair in the long run. It’s always better to fix a wobble sooner rather than later.
Conclusion
A wobbly chair doesn’t have to mean a trip to the furniture store. In most cases, the fix is simpler than you’d expect — a little wood glue, some clamping time, or a few felt pads can bring your favorite chair back to solid, stable life.
The key is to start with a good diagnosis. Figure out whether the problem is in the joints, the leg length, or the floor before picking up a single tool. From there, the repair almost tells you what to do.
Whether you’re dealing with a rickety dining chair that’s been wobbling for years or a beloved accent chair that’s just starting to flex at the joints, the steps in this guide give you everything you need to handle it yourself — no expensive repairs, no replacements.
Take action today. Flip that chair over, find where the wobble starts, and fix it. Your back, your floors, and your sanity will thank you.
This article is for informational purposes only. Always exercise caution when performing furniture repairs. If a chair shows signs of severe structural damage, consult a professional furniture restorer before using it again.
