
If your garage door suddenly feels like it weighs three hundred pounds, or it won’t budge past a few inches, you’re probably dealing with a broken spring. Knowing how to replace garage door spring parts yourself is possible in some cases, but it is also one of the riskier repairs a homeowner can attempt. This guide walks through what actually happens when a spring fails, what it costs to fix, which repairs are reasonable to do yourself, and which ones are worth paying a professional to handle.
The short answer: extension springs are relatively manageable for an experienced DIYer with the right tools, while torsion springs store enough force to cause serious injury and are best left to a trained technician. Read on for the full breakdown, including signs of failure, lifespan expectations, real cost ranges, and a safety checklist you should not skip.
What Does a Broken Garage Door Spring Look Like
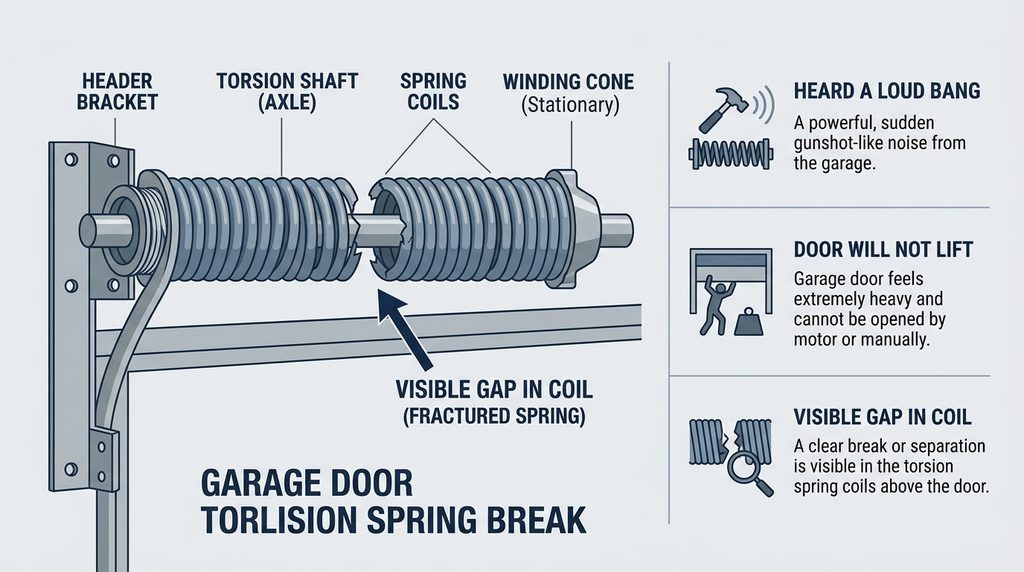
Before replacing anything, confirm that the spring is actually the problem. A broken spring usually announces itself clearly, and the symptoms tend to show up together rather than one at a time.
- A loud bang from the garage. Springs almost always fail while the door is closed and under full tension. Homeowners often describe the sound as a gunshot or something slamming into the wall.
- The door won’t lift, or stops after a few inches. The opener motor isn’t built to lift the door’s full weight on its own. Without spring support, it strains, hums, or trips a safety sensor.
- A visible gap in the coil. On a torsion spring, look at the horizontal shaft mounted above the door. A clean separation of an inch or more in the coil means the spring has snapped.
- One side hangs looser than the other. On older doors with extension springs running along the horizontal tracks, a broken spring will sag compared to the intact one.
- The door feels unusually heavy when lifted by hand. Disconnect the opener and lift manually. A properly balanced door should move with only light effort; if it feels like dead weight, the spring has lost its tension.
If you notice any combination of these signs, stop using the automatic opener until the spring is addressed, especially if the door is also shaking or vibrating during operation. Continuing to operate a door with a failed spring can damage the opener’s drive gear and puts anyone nearby at risk if the door drops unexpectedly.
Torsion vs Extension Springs: Know What You’re Dealing With
Not all garage door springs work the same way, and the type installed on your door determines how dangerous the repair is and what tools you’ll need. Most homes built or upgraded in the last two decades use torsion springs; older single-car garages sometimes still run on extension springs.
| Feature | Torsion Springs | Extension Springs |
|---|---|---|
| Location | Mounted horizontally on a shaft above the door | Run along the horizontal tracks on each side |
| How they work | Twist and store energy through torque | Stretch and store energy through tension |
| Typical lifespan | Roughly 10,000 to 15,000 cycles | Roughly 7,000 to 10,000 cycles |
| DIY difficulty | High risk; requires winding bars and precise technique | Moderate risk; more forgiving for careful DIYers |
| Safety hardware | Contained by the shaft itself | Requires a safety cable through the spring |
| Common on | Most modern residential doors | Older or lighter single-car doors |
Extension springs carry real risk too, but the energy is more predictable and the tools required are simpler. A safety containment cable threaded through the spring is essential on this type; without one, a snapped spring can fly several feet and cause serious injury or property damage, which is why door manufacturers require them on every installation, as outlined in a residential safety checklist.
How Long Do Garage Door Springs Last
Garage door springs aren’t rated in years. They’re rated in cycles, where one cycle equals a single full open-and-close movement. A standard residential spring is typically built for about 10,000 cycles, though the number varies by manufacturer and spring grade.
How that translates into real-world years depends entirely on how often the door is used:
| Daily Opens | Estimated Lifespan (10,000-cycle spring) |
|---|---|
| 2 (light use, weekend driver) | 12 to 14 years |
| 4 (average household) | 6 to 7 years |
| 6 to 8 (heavy use, multiple drivers) | 3 to 5 years |
Households that use the garage as their main entry point tend to land in the four-to-six-cycle range, which puts most standard springs somewhere between five and seven years of service. Higher-grade springs rated for 25,000 cycles or more cost a bit more upfront but roughly double or triple that lifespan, which can be worth it if you use the door frequently. Cold weather also plays a role, since metal contracts and becomes more brittle in low temperatures, which is a common reason springs snap during the coldest weeks of winter rather than gradually wearing out.
How Much Does It Cost to Replace Garage Door Springs
Pricing depends on spring type, door weight, whether one or two springs need replacing, and local labor rates. Based on typical contractor quotes across the country, homeowners can expect the following general ranges:
| Job Type | Typical Cost Range |
|---|---|
| Single torsion spring (parts and labor) | $150 to $350 |
| Pair of torsion springs (standard two-car door) | $300 to $650 |
| Extension spring replacement (per pair) | $120 to $300 |
| High-cycle or heavy-duty upgrade springs | Add $60 to $150 per spring |
| DIY parts only (springs, cables, cones) | $40 to $120 |
A same-day emergency call, an older or oversized door, or a technician who also needs to replace worn cables, drums, or bearings will push costs toward the higher end. If only one spring in a pair has broken, most technicians still recommend replacing both at the same time, since the surviving spring is close to the end of its own cycle life and will likely fail again soon under the extra strain of doing the job alone.
Why Garage Door Spring Replacement Is Dangerous
This is the part of the guide that matters most, so it’s worth reading even if you’re confident with tools. A wound torsion spring on a standard residential door stores a significant amount of mechanical energy while the door is closed. If that energy releases suddenly, whether from a slipped winding bar, the wrong spring size, or a cone that isn’t secured properly, the spring or bar can move with enough force to break bones, cause deep lacerations, or cause head and eye injuries.
The manufacturers’ trade association that sets industry standards for residential spring systems has fielded enough documented injury reports over the years that it continues to advise consulting a trained door systems technician for spring repairs rather than attempting them without experience. That advice isn’t marketing. It reflects a genuine, well-documented hazard pattern in the industry.
A few additional risk factors are worth knowing before you decide whether to do this yourself:
- Working at height. Most spring work involves a stepladder positioned under a heavy, tensioned system. Following ladder safety guidance for footing, three points of contact, and proper ladder angle reduces one of the most common causes of injury during this job, which is simply falling.
- An unbalanced door after the repair. A door that isn’t properly counterbalanced can crash down unexpectedly. The Consumer Product Safety Commission recommends a simple balance test: disconnect the opener, lift the door manually to the halfway point, and let go. A correctly balanced door should stay in place rather than sliding down or springing up.
- Reusing worn hardware. Old cables, pulleys, or brackets that look fine can fail shortly after a spring replacement if they were already near the end of their service life.
If at any point during the process something doesn’t feel right, stop, back away from the door, and call a professional. There is no repair task in this guide worth risking a serious injury over.
How to Replace Garage Door Spring (Extension Type) Step by Step
Extension springs are the more approachable option for a careful DIYer because the tension is easier to control and the tools involved are simpler than a torsion setup. Work through these steps only if your door uses extension springs and you have someone nearby who can help or call for assistance if needed.
- Close the door fully and disconnect the automatic opener so it can’t engage mid-repair.
- Clamp the tracks with locking pliers or a C-clamp just below the bottom roller on each side, so the door can’t slide down while you work.
- Mark the pulley position with tape before removing anything, so the new spring installs in exactly the same spot.
- Release tension carefully by unhooking the old spring from the track bracket, keeping your hands and face clear of the spring’s path.
- Thread the safety cable through the new spring before installing it, then attach the spring to the bracket and reconnect the pulley at your marked position.
- Remove the clamps, reconnect the opener, and test the door manually first, then with the opener, watching for smooth and even movement on both sides.
- Run the balance test described earlier before considering the job complete.
If your door uses two extension springs, always replace both at the same time, even if only one has broken. Mismatched spring tension puts uneven strain on the opener and the door itself, and it’s one of the most common causes of a second failure within months of the first repair.
Torsion Spring Replacement: Why Most Pros Say Leave It to a Professional
Torsion spring replacement follows a similar general sequence: clamp the door, disconnect the opener, use winding bars to carefully unwind and remove the old spring from the shaft, then wind the new one to the correct number of turns based on door weight and spring size. In practice, though, this is where things go wrong most often.
Winding bars have to be the correct length and inserted fully into the winding cone before any tension is released, and the number of turns has to match the spring’s rated size almost exactly. A miscount of even a quarter turn can leave the door dangerously unbalanced. Because the spring sits directly above the doorway at head height when fully wound, an error here puts the person doing the work directly in the path of the highest-energy component in the entire system.
This is the point where hiring a licensed and vetted garage door technician, such as Overhead Door of Denver, genuinely pays for itself. A trained installer carries the right winding bars, correctly sized springs, and the experience to recognize when a shaft, bearing, or bracket also needs attention, something that’s easy to miss on a first attempt.
Common Mistakes to Avoid
- Using the wrong tool in place of winding bars, such as screwdrivers or pliers, which can slip under load.
- Buying a spring based on the door’s weight alone instead of matching wire size, coil diameter, and length to the original.
- Skipping the safety cable on extension springs to save a few minutes.
- Replacing only one spring in a pair instead of both.
- Standing directly in front of or underneath the spring while releasing or applying tension.
- Forgetting to lubricate the new spring, which shortens its cycle life significantly in the first few months.
- Reconnecting the opener before confirming the door is properly balanced by hand.
DIY vs Hiring a Professional
| Factor | DIY Replacement | Professional Replacement |
|---|---|---|
| Cost | Lower, parts only | Higher, includes labor and warranty |
| Time | 1 to 3 hours, plus a supply run | Typically 30 to 60 minutes |
| Injury risk | Higher, especially with torsion springs | Low, technician trained for the task |
| Tools required | Must own or rent winding bars, clamps, safety glasses | Technician brings all equipment |
| Warranty | None unless self-purchased on parts | Often includes labor and parts warranty |
| Best for | Extension springs, confident and cautious DIYers | Torsion springs, any hesitation, older or heavier doors |
How to Maintain Your Springs and Extend Their Life
- Lubricate twice a year with a silicone-based or lithium-based garage door lubricant, never household oil, which attracts dirt and grime.
- Inspect monthly for rust, visible wear, or gaps in the coil, especially before extreme weather swings.
- Test the balance every few months using the manual lift test described earlier.
- Keep the door’s weight in check by avoiding added insulation panels or decorations that weren’t accounted for in the original spring sizing.
- Address squeaks and grinding sounds early, since unusual noise is often the first sign of a spring nearing the end of its cycle life.
FAQs
How long do garage door springs last?
Most standard residential springs are rated for about 10,000 cycles, which works out to roughly six to seven years for an average household that opens the door four times a day. Light use can stretch that past a decade, while heavy daily use can wear a spring out in three to five years. Upgraded high-cycle springs rated for 25,000 or more cycles last correspondingly longer.
How much does it cost to replace garage door springs?
A single torsion spring typically runs $150 to $350 installed, while a matched pair on a standard two-car door often falls between $300 and $650. Extension spring pairs tend to run a bit less, usually $120 to $300. Prices rise with heavier doors, older hardware, or emergency same-day service.
What does a broken garage door spring look like?
The most reliable signs are a loud bang from the garage, a door that won’t lift past a few inches, and a visible gap or separation in the coil of a torsion spring mounted above the door. On extension spring systems, a broken spring will hang noticeably looser than its intact match on the other side.
Can I replace just one spring if only one is broken?
You can, but most technicians recommend replacing both springs in a pair at the same time. The surviving spring has usually gone through nearly as many cycles as the one that failed, so it’s likely to break soon after under the added strain of lifting the door alone.
Is it safe to replace a torsion spring myself?
It can be done by an experienced, well-prepared DIYer, but the risk of serious injury is real and well documented across the garage door industry. If you’re not fully confident in identifying spring size, using winding bars correctly, and counting turns precisely, this is a job worth paying a professional to handle.
What tools do I need to replace a garage door spring?
For extension springs, you’ll typically need locking pliers or C-clamps, a ladder, safety glasses, and the replacement spring with its safety cable. Torsion spring replacement additionally requires properly sized winding bars, a socket wrench, and precise measurements of the old spring’s wire gauge, coil diameter, and length.
How do I know what size replacement spring I need?
Measure the wire diameter, the inside coil diameter, and the overall length of the existing spring, or check for a manufacturer color code on the spring itself, which many brands use to indicate wire size. When in doubt, bring the old spring or its measurements to a garage door supply store rather than guessing.
Why does my garage door spring keep breaking?
Repeated early failures usually point to a spring that’s undersized for the door’s actual weight, a door that has gained weight from added insulation or hardware, lack of lubrication, or heavy daily use that’s simply cycling through the spring’s rated lifespan faster than expected.
Final Thoughts
Learning how to replace garage door spring components can save you a service call, but it’s not a repair to rush into without understanding what you’re working with. Extension springs are reasonable for a careful, well-prepared DIYer, while torsion springs carry enough stored energy that most industry professionals recommend hiring a trained technician rather than risking it. Whichever route you choose, confirm the spring type, match the replacement carefully, follow every safety step, and never skip the balance test once the job is done. If anything about the process feels uncertain, it’s worth the cost of a professional visit for the peace of mind alone.

