

I still remember the first time I cut a leaf off my snake plant and stuck it in a jar of water, half-convinced I’d just murdered a perfectly healthy houseplant. Three weeks later, when I spotted a tiny white root poking out from the base, I felt like I’d discovered fire.
That’s the magic of learning how to propagate snake plant specimens — it’s almost impossible to mess up, and the payoff feels disproportionately exciting for how little effort it takes.
Snake plants, botanically known as Dracaena trifasciata (until 2017 known as Sansevieria trifasciata), are some of the toughest, most forgiving houseplants you can own. They’re also one of the easiest plants to multiply for free, whether you want to fill more corners of your home, give plants away as gifts, or rescue an overgrown specimen by dividing it.
In this guide, we’ll walk through every proven propagation method — water, soil, division, and even leaf cuttings — along with the mistakes that trip up beginners, how long to expect things to take, and what to do once your new plant starts growing roots.
What Is a Snake Plant (And Why Is It So Easy to Propagate)?
Snake plants are a staple in homes, offices, and waiting rooms for good reason. They tolerate neglect, low light, and irregular watering better than almost any other houseplant.
Part of what makes them so resilient is their growth habit. Snake plants spread through underground stems called rhizomes, and they form dense clumps that spread by creeping rhizomes, which are sometimes above ground and sometimes underground. This rhizome system is also exactly why propagation is so straightforward — every healthy leaf and every rhizome segment is a potential new plant.
A quick note on naming: you’ll see this plant called both Sansevieria trifasciata and Dracaena trifasciata. In 2017, botanists at Royal Botanic Gardens, Kew published the now-official name, Dracaena trifasciata, based on genome sequencing that placed the snake plant under the Dracaena genus. Don’t worry — nurseries still use both names interchangeably, and it doesn’t change how you care for or propagate the plant.
Before You Start: What You’ll Need
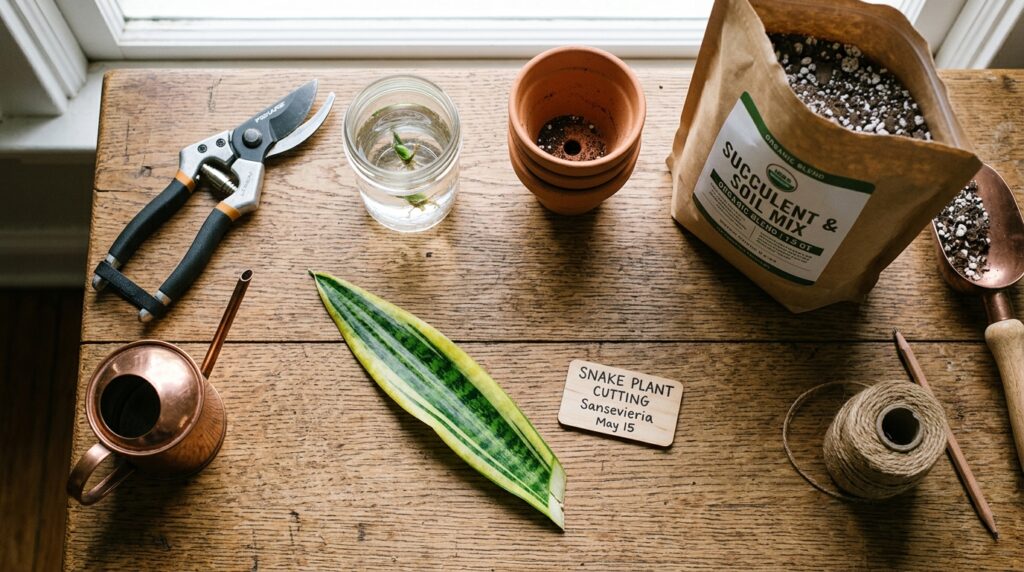
You don’t need fancy equipment to propagate a snake plant, but having the right basics on hand makes a big difference in your success rate.
Here’s your essential toolkit:
- A clean, sharp tool — a knife, pruning shears, or sharp scissors for clean cuts
- A healthy parent plant — pick one with thick, vibrant, blemish-free leaves
- Small pots with drainage holes — for soil propagation and transplanting
- Well-draining potting mix — a cactus or succulent blend works best
- Glass jars or containers — for water propagation
- Filtered or distilled water — tap water can cause mineral buildup on roots over time
Method 1: How to Propagate Snake Plant in Water
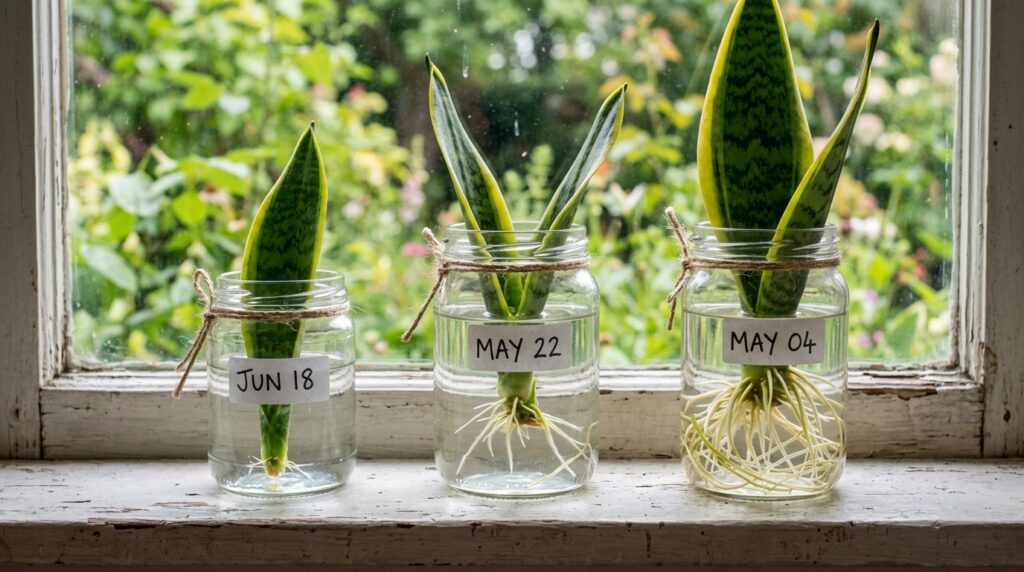
Water propagation is the most satisfying method for beginners because you can actually watch the roots develop. It’s also the method that turned me into a snake plant evangelist — there’s something deeply calming about checking a jar every few days and seeing tiny white threads appear.
Step-by-Step Water Propagation
- Choose a healthy, mature leaf. Avoid leaves with brown tips, soft spots, or yellowing.
- Cut the leaf near the base, close to the soil line, using a clean, sharp tool.
- Cut the leaf into sections (if it’s long) — most guides recommend pieces around 4 to 6 inches long. As one source explains, if the leaf is really long, cut it into shorter segments, with each piece measuring 4 to 5 inches in length, which is a good way to get more plants out of a single leaf.
- Mark the bottom end. Roots only grow from the end that was closest to the soil, so make an inverted V-shaped cut or notch on that end of each cutting to remind you which end to immerse in water.
- Let the cut ends callus. This is the step almost everyone skips — and shouldn’t. Place the segments somewhere dry with indirect light for one or two days, allowing a callus to form over the wound, which lowers the chance of bacterial infection and rot.
- Place cuttings in water. Use a clean jar and submerge the callused end of the cuttings in water until about a quarter of the leaf segment is underwater — don’t let an entire cutting sit in water or it may rot.
- Position in bright, indirect light. Avoid harsh direct sun, which can scorch the leaf above water.
- Change the water regularly. Fresh water keeps oxygen levels up and prevents algae or bacterial buildup.
How Long Does Water Propagation Take?
Patience is key here. In the right conditions, a new plant may take six to eight weeks for root growth, and for an indoor plant without sufficient indirect light, new growth may take even longer.
Once roots are an inch or two long, you can transfer the cutting to soil — though many people simply leave it in water indefinitely, topping up as needed.
Method 2: How to Propagate Snake Plant in Soil
Soil propagation skips the water step entirely and goes straight to the final growing medium. It’s slightly less visually rewarding (you can’t see the roots forming), but many growers find it produces sturdier root systems because the roots adapt to soil conditions from day one.
Step-by-Step Soil Propagation
- Select and cut a healthy leaf, just as you would for water propagation.
- Cut into sections. A common recommendation is to cut the leaf into several pieces, each 1–2 inches long, depending on the size and type of plant you choose.
- Mark the bottom of each cutting with a notch or slanted cut so you don’t plant it upside down.
- Let the cuttings callus. This is non-negotiable in soil propagation, since the cut end will be in direct contact with moist soil. As Iowa State University Extension confirms, you must allow the cut edges to dry and heal (callous) for several days before inserting them in a rooting medium.
- Choose the right pot and soil. Pick a small pot with drainage holes and fill it with a fast-draining mix — a pre-made cactus or succulent mix works well, and a fast-draining mix is critical to prevent rot.
- Plant the cuttings. Insert the cuttings in the soil about 1/2 inch deep — no rooting powder is necessary. Some growers go slightly deeper, up to 1 to 2 inches deep, depending on the cutting’s length and stability.
- Water lightly and place in bright, indirect light. Keep the soil lightly moist and wait until it’s almost dry before watering again — always empty the saucer of excess water.
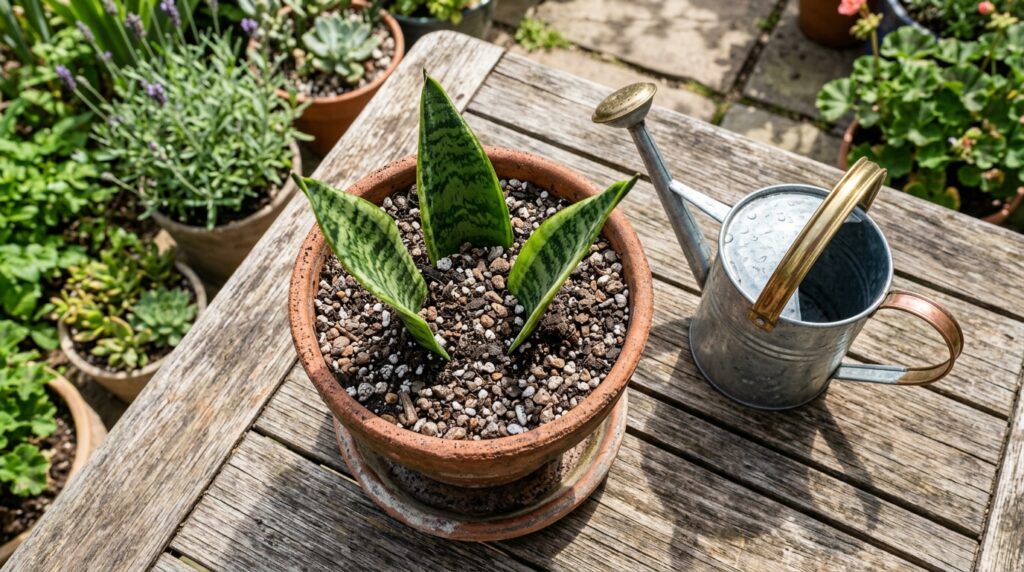
When Will You See New Growth?
This is the exciting part. In a month or two, you should see new leaves emerging from the soil, which indicates the cuttings have rooted. Once that happens, you can transplant the cuttings into individual pots to prevent overcrowding and care for them like the mother plant.
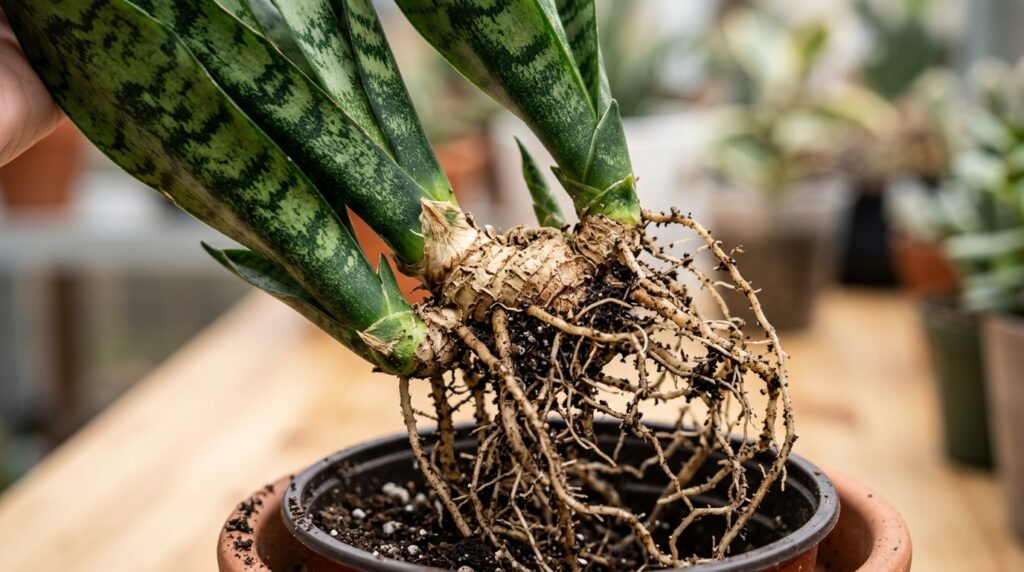
Method 3: How to Propagate Snake Plant by Division

If your snake plant has gotten big, top-heavy, or is bursting out of its pot, division is your best friend. It’s the fastest method, it produces an instantly mature-looking plant, and — crucially — it’s the only method that reliably preserves variegated leaf patterns.
Why Division Matters for Variegated Varieties
If you’ve got a ‘Laurentii’ or other striped variety, leaf cuttings won’t give you the same look. As one plant expert explains, in variegated snake plants, two genetically different types of tissue grow together to form a leaf — so if you use a leaf cutting to propagate a ‘Laurentii’, you’ll get only the green and silver portions but no yellow foliage.
Other sources confirm this pattern: snake plant cuttings from variegated varieties may not retain variegation, so propagation by division is recommended for variegated snake plants.
Step-by-Step Division
- Remove the plant from its pot. Gently slide it out, tipping the pot on its side if needed.
- Locate the rhizomes. Look for rhizomes under the soil near the root system — these are the thick, horizontal stems connecting individual leaf clusters.
- Identify natural division points. Look for sections of the plant that already have their own cluster of leaves and roots attached.
- Cut the rhizome. Using a clean, sharp knife, cut the rhizome from the base of the plant, keeping roots attached to each section.
- Let cuts callus briefly. Allow the rhizome cutting to callus for one to two days to prevent root rot.
- Repot each division. Once calluses form, repot the rhizome sections in fresh potting mix.
Division Pros and Cons
| Pros | Cons |
|---|---|
| Faster than leaf propagation | You need to uproot the parent plant, which might damage it if you’re not careful |
| New leaves retain variegation of the original plant | Requires a large snake plant with multiple growths |
| Produces an instantly established plant | More physically demanding than leaf cuttings |
Method 4: Propagating Snake Plant from Seeds (For the Curious)
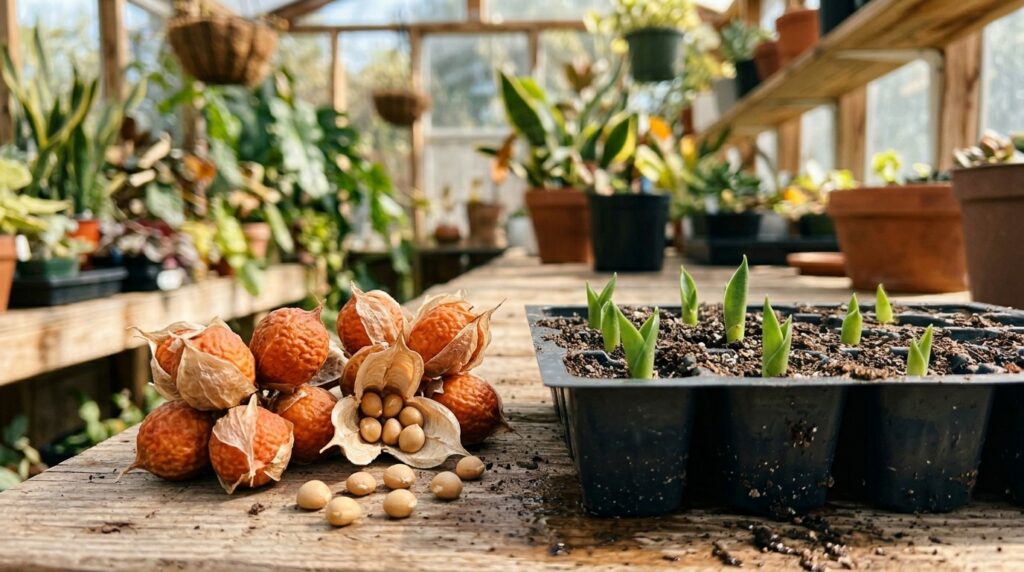
This method is rarely used by home growers because it’s slow and snake plants grown indoors rarely flower or produce viable seed. But if you’re curious or have access to seeds, here’s the gist: take ripe seed pods from a flowering snake plant, extract the seeds, and sow them in a moist, well-draining mix. Germination can take several weeks, and seedlings grow much slower than cuttings or divisions.
For nearly everyone, sticking to leaf cuttings, water propagation, or division will get you results faster and with far less guesswork.
Comparing the 4 Propagation Methods
| Method | Speed | Difficulty | Keeps Variegation? | Best For |
|---|---|---|---|---|
| Water propagation | Moderate (6–8 weeks) | Easy | No | Beginners who want to watch roots grow |
| Soil propagation | Moderate (4–8 weeks) | Easy | No | Hands-off growers, larger batches |
| Division | Fast (immediate) | Moderate | Yes | Mature plants, variegated varieties |
| Seeds | Very slow (months) | Hard | Varies | Hobbyist experimentation |
Common Mistakes That Kill Snake Plant Cuttings
Even though snake plants are forgiving, a few habits will sabotage your propagation efforts every time.
1. Skipping the Callusing Step
This is the single biggest mistake beginners make. Skipping it invites rot — as one grower bluntly puts it, if you skip the callusing step, the leaf may rot.
2. Submerging the Whole Cutting in Water
Only the bottom portion needs to be in water. Don’t let an entire cutting sit in water, or it may rot.
3. Using Tap Water for Long-Term Rooting
Use filtered or distilled water over tap water, since tap water can cause mineral buildup that might harm the new roots forming.
4. Planting Cuttings Upside Down
Roots only emerge from the end that was closest to the original plant’s base. That’s why marking your cuttings with a notch matters so much — plant it upside down and it simply won’t root.
5. Overwatering New Cuttings
Snake plants are succulents at heart. Letting the soil dry out between waterings is essential — overly wet soil is the fastest route to rot for both established plants and fresh cuttings.
6. Expecting Variegation from Leaf Cuttings
If you took a leaf cutting from a striped ‘Laurentii’ hoping for striped baby plants, you’ll likely be disappointed — cuttings taken from variegated snake plants will revert to solid green as they grow.
Best Time of Year to Propagate Snake Plants
Timing isn’t make-or-break for snake plants, but it does affect speed. Soil propagation works best in summer and spring, as roots will develop faster during these warmer months.
Cooler temperatures slow down root development significantly, so if you’re propagating in fall or winter, expect to wait longer for visible progress — and place your cuttings somewhere consistently warm, away from cold drafts or windows.
Caring for New Snake Plant Cuttings After Propagation
Once your cutting has rooted and is showing new growth, the transition phase matters.
- Light: Place the pot in bright, indirect light away from direct sunlight.
- Watering: Water only when the soil is nearly dry, and always allow excess water to drain freely.
- Repotting: As new leaves emerge and the cutting establishes itself, you can move it into a slightly larger pot with fresh succulent mix.
- Patience: New snake plants grow slowly even under ideal conditions — don’t expect rapid size increases for several months.
If your cutting seems stalled, the most common culprits according to growers are insufficient light, water, or nutrients, or excessive direct sunlight.
A Quick Note on Pet Safety
Before you start placing new snake plant babies around your home, it’s worth knowing that snake plants aren’t pet-friendly. According to the ASPCA, Sansevieria trifasciata is toxic to both dogs and cats, with saponins as the toxic principle and clinical signs including nausea, vomiting, and diarrhea.
If you have curious cats or dogs, keep new cuttings and divisions on high shelves, in rooms pets can’t access, or in hanging planters out of reach. If you suspect ingestion, the ASPCA recommends contacting their Animal Poison Control or your local veterinarian as soon as possible.
Expert Tips for Higher Propagation Success Rates
After years of propagating snake plants (and killing my fair share early on), here are the tips that consistently make the biggest difference:
- Always use a sterile cutting tool. Wipe your blade with rubbing alcohol before and between cuts to avoid spreading bacteria or fungal spores.
- Choose the thickest, healthiest leaves. Thin or stressed leaves have less stored energy to fuel root development.
- Don’t rush the callus stage. A day or two of drying time costs you nothing but saves a huge percentage of cuttings from rot.
- Group multiple cuttings in one pot for visual fullness, then separate them once each has its own root system — this mirrors how mixing different snake plant varieties in one container can create a fuller look.
- Label and date your cuttings. It’s easy to lose track of which jar started when, especially if you’re propagating multiple leaves at once.
- Resist the urge to tug on cuttings to check for roots. Disturbing a forming root system can set development back by weeks.
Frequently Asked Questions
How long does it take for a snake plant cutting to root?
Most cuttings take six to eight weeks to develop roots under good conditions, though this can extend to several months if light or warmth is insufficient.
Can I propagate a snake plant from just one leaf?
Yes. You can get a lot of cuttings from a single leaf by cutting it into multiple sections, each capable of rooting and growing into its own plant.
Why is my snake plant cutting rotting instead of rooting?
The most common causes are skipping the callusing step before planting or submerging cuttings, using non-sterile tools, or keeping cuttings too wet. Allowing cut edges to dry and heal for several days before inserting them in a rooting medium dramatically reduces rot risk.
Will a propagated snake plant look the same as the parent plant?
For solid-green varieties, yes. For variegated varieties like ‘Laurentii’, leaf cuttings will revert to solid green as they grow — only division preserves the original pattern.
Is water or soil propagation better for snake plants?
Both work well. Water propagation lets you monitor root development visually, while soil propagation skips a transplant step entirely. Choose based on your preference — the success rates are comparable when you follow proper callusing steps.
Conclusion: Start Your Snake Plant Propagation Today
Propagating a snake plant is one of the most beginner-friendly plant projects you can take on, and the four methods above — water, soil, division, and seeds — give you flexibility no matter what your starting plant looks like.
The real secret isn’t some hidden trick; it’s simply letting your cuttings callus properly, giving them bright indirect light, and being patient while roots quietly do their work underground.
Got an overgrown snake plant sitting in the corner? Don’t let it go to waste. Grab your shears, pick a method from this guide, and start your first cutting today — in a couple of months, you could have a whole new plant (or three) to show for it.
