
Asparagus is a strange vegetable to fall in love with because it asks for patience most crops don’t. Plant it once, wait a couple of seasons, and then harvest the same bed every spring for the next fifteen or twenty years.
If you’re wondering how to grow asparagus without wasting a season on mistakes, the process really comes down to picking the right planting method, giving the roots room to spread, and resisting the urge to harvest too early. None of it is complicated once you know what the plant actually needs.
Understanding Asparagus Before You Plant
Asparagus is a perennial, which sets it apart from almost everything else in a typical vegetable patch. Tomatoes and lettuce get replanted every year. Asparagus, once established, keeps sending up spears from the same crown for well over a decade.
That long lifespan is exactly why site selection matters so much. Wherever you plant it is where it stays, so a spot chosen carelessly becomes a years-long inconvenience.
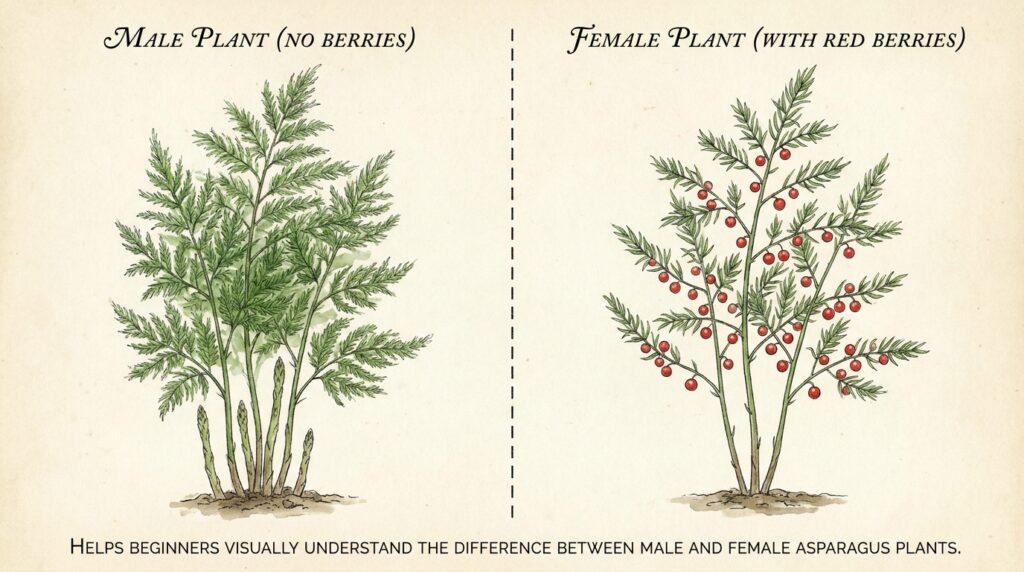
Asparagus plants are also dioecious, meaning individual plants are either male or female. Female plants produce red berries that drop seed and sprout as unwanted volunteers throughout the bed, while male plants put more energy into producing thicker, more uniform spears. Most modern hybrid varieties, including the well-known Jersey series, are bred to be all-male for exactly this reason.
Picking the Right Site and Preparing the Soil
Full sun is non-negotiable. Asparagus wants at least eight hours of direct light a day, and beds tucked into partial shade tend to produce thin, weak spears no matter how well the soil is prepared.
Drainage matters just as much as sunlight. Asparagus crowns sitting in soggy, waterlogged soil are prone to crown and root rot, which can wipe out an entire bed. If your yard tends to collect water after rain, consider preparing a raised bed instead of planting directly in the ground, since raised soil drains far more reliably.
A few soil preparation basics worth following:
- Test your soil pH before planting. Asparagus prefers a range around 6.5 to 7.0, and soil that’s too acidic will need lime worked in ahead of time.
- Work several inches of compost or well-rotted manure into the top foot of soil, since choosing healthy asparagus crowns only pays off if the soil underneath them is rich and loose.
- Clear the site of perennial weeds a full season before planting if possible. Once asparagus is in the ground, weeding around established crowns becomes far trickier.
- Position the bed on the north or east side of the garden so the tall summer ferns, which reach five to six feet, don’t shade shorter crops nearby.
How to Grow Asparagus From Crowns
Crowns are the fastest and most reliable way to get an asparagus bed producing, and they’re what most home gardeners use.
A crown is essentially a one-year-old asparagus plant with its roots already developed, sold dormant and ready to plant in early spring. Buying crowns skips the slow germination stage entirely, shaving a full year off the wait before your first harvest.
Steps for planting asparagus crowns:
- Dig a trench roughly six to eight inches deep and about a foot wide.
- Mix compost into the loosened soil at the bottom of the trench.
- Set each crown upright in the trench with roots spread out like an octopus, spacing crowns 12 to 18 inches apart.
- Cover the crown with just two to three inches of soil, leaving the rest of the trench open.
- As shoots emerge over the following weeks, gradually fill in the trench with more soil until it’s level with the surrounding ground.
Choosing quality crowns makes a real difference here. Healthy crowns feel firm and slightly moist, with roots that show white when cut, not the reddish-brown discoloration associated with root rot disease.
How to Grow Asparagus From Seed
Starting asparagus from seed takes longer, usually an extra full year before the first harvest, but it’s noticeably cheaper and opens up variety options that aren’t always sold as crowns.
Seeds need warmth to germinate, so most gardeners start them indoors roughly twelve weeks before the last expected frost date. Soak the seeds overnight to soften the hard outer coat, then sow them about half an inch deep in small pots filled with seed-starting mix.
Germination is slow and can take anywhere from two to eight weeks, so patience matters here more than anywhere else in the process. Once seedlings reach about twelve inches tall and outdoor soil has warmed past 50°F, they can be hardened off and transplanted into their permanent bed.
According to university guidance on planting asparagus from seed, starting from seed typically pushes the first light harvest back to the third or even fourth year, compared to the second year for crown-planted beds. That tradeoff is worth knowing before committing to seed over crowns, especially for gardeners eager for a quicker payoff.
How to Grow Asparagus From Root Divisions (Cuttings)
Asparagus doesn’t propagate well from stem cuttings the way tomatoes or herbs do. Instead, gardeners who already have an established bed can expand it through root division, which is the closest equivalent and often gets searched under the same general idea.
Root division involves digging up a mature crown, usually one that’s been in the ground for at least three years, and carefully splitting it into sections that each retain healthy roots and at least one growth bud.
Basic steps for dividing asparagus roots:
- Dig around a mature crown in early spring before new growth appears, staying well clear of the root mass to avoid damage.
- Lift the entire crown out of the ground gently.
- Use a clean, sharp knife to divide the crown into sections, each with visible buds and a healthy portion of root.
- Replant divisions immediately using the same trench method described earlier, since exposed roots dry out quickly.
This method works, but it does set the divided plant back for a season or two while it recovers from the disturbance. Most gardeners only divide roots when they’re deliberately expanding a bed or relocating an established planting, rather than as a first-choice starting method.
How to Grow Asparagus in a Raised Bed
Raised beds solve two of the biggest asparagus headaches at once: poor drainage and compacted native soil. Because you control exactly what fills the bed, you can build the loose, rich, well-drained growing medium asparagus actually wants from day one.
A bed at least twelve to eighteen inches deep gives crowns enough room to establish a strong root system without hitting the compacted subsoil underneath. Fill it with a blend of topsoil, compost, and aged manure in roughly equal parts.
Spacing inside a raised bed follows the same rules as an in-ground planting: about 12 to 18 inches between crowns, with rows spaced far enough apart that you can walk between them without stepping on the root zone. Since raised soil warms up faster in spring, gardeners in cooler climates often get an earlier start on the growing season this way, and the improved drainage also means less risk of the crown rot that plagues asparagus in heavy clay soil.
According to Colorado gardening guidance on establishing an asparagus bed, bareroot crowns purchased locally tend to establish faster than mail-order crowns that spend extra days out of the ground, which is worth keeping in mind whether you’re planting a raised bed or an in-ground row.
How to Grow Asparagus in Pots
Container growing isn’t the traditional way to raise asparagus, and it comes with real limitations, but it’s a workable option for gardeners without in-ground space.
The biggest constraint is root space. Asparagus crowns develop an extensive, spreading root system that struggles in anything too small. A container needs to be at least 18 to 20 inches deep and roughly the same in width for a single crown to have any real chance of thriving.
Basic steps for container-grown asparagus:
- Choose a large container with multiple drainage holes, since standing water is one of the fastest ways to lose a crown to rot.
- Add a couple inches of gravel at the bottom for extra drainage.
- Fill the rest with a mix of potting soil, compost, and aged manure.
- Plant one crown per container, buried about four to six inches deep.
- Place the container somewhere it gets at least eight hours of direct sun daily.
One important tradeoff: potted asparagus rarely lasts as long as an in-ground bed. Where a garden planting can produce for fifteen to twenty years, container plants typically stay productive for only three or four seasons before the confined roots wear the plant out. Winter is also harder on potted crowns, since the roots are more exposed to freezing temperatures than they would be underground, so many gardeners in colder regions sink the pot into the ground or insulate it heavily once the weather turns cold.
Caring for Asparagus During the First Two Years
The two years right after planting matter more than any other stage. This is when the crown is building the root reserves it will draw on for the rest of its productive life, and rushing the process by harvesting too early weakens the entire planting.
First-year care:
- Water consistently, aiming for about an inch a week, more during hot, dry stretches.
- Let the ferny foliage grow freely all season. It’s photosynthesizing energy straight back down into the crown.
- Weed carefully by hand near young crowns, since shallow cultivation tools can nick developing roots.
- Do not harvest any spears in the first year, no matter how tempting they look.
Second-year care:
- Continue consistent watering and weeding.
- A very light harvest, just a few spears over a couple of weeks, is sometimes acceptable in year two, though many gardeners still choose to wait.
- Fertilize in early spring as new growth starts, and again lightly after the ferns die back in fall.
By the third spring, most beds are ready for a full, proper harvest season.
When and How to Harvest Asparagus Spears
Harvest season typically runs six to eight weeks starting in mid to late spring, though the exact timing shifts depending on climate and how warm the soil has gotten.
Spears are ready to cut once they reach about six to eight inches tall, before the tightly closed tip begins to loosen and fern out. Waiting too long turns the spear woody and bitter at the base.
How to harvest:
- Locate a spear at the right height, still tightly closed at the tip.
- Use a sharp knife to cut it at or just below the soil line, or snap it by hand where it naturally breaks.
- Check the bed every day or two during peak season, since spears grow quickly in warm weather.
- Stop harvesting once new spears start emerging noticeably thinner than earlier in the season, which signals the crown’s energy reserves are running low for the year.
Letting the plant grow its full fern canopy after harvest season ends is essential. That foliage recharges the crown for next spring, so cutting it back early, even though it can look untidy, sets the following year’s harvest back.
Common Pests and Problems
| Problem | What to look for | What to do |
|---|---|---|
| Asparagus beetle | Small striped or spotted beetles chewing on spears and ferns | Hand-pick beetles, remove debris in fall where they overwinter |
| Rust disease | Orange-brown spots or streaks on fern foliage | Choose rust-resistant varieties, avoid overhead watering |
| Crown rot | Wilting, yellowing spears, mushy crown when dug up | Improve drainage, avoid replanting in the same spot |
| Thin, spindly spears | Weak spear diameter over successive years | Reduce harvest length, boost fall fertilization |
Good airflow, consistent weeding, and avoiding waterlogged soil handle most of these problems before they get serious.
Asparagus beetles are the most common visitor to a home bed, and they show up almost every season once a planting matures. The adults are small, roughly a quarter inch long, with a metallic blue-black body and cream-colored spots along the wing covers. They lay dark eggs directly on the spears during harvest season, which is often the first sign gardeners notice.
Hand-picking is usually enough to keep populations under control in a small backyard bed. Checking plants every few days during the height of harvest season, dropping any beetles you spot into a cup of soapy water, keeps numbers low without reaching for chemical treatments. Clearing old fern debris in late fall also removes the spots where adult beetles like to overwinter, which cuts down on next year’s population before it even starts.
Rust disease tends to show up later in the season, usually on the ferny growth after harvest has ended rather than on the spears themselves. It spreads fastest in humid conditions with poor airflow, so spacing plants generously and watering at the soil level instead of overhead goes a long way toward preventing it. Several modern hybrid varieties carry built-in rust resistance, which is worth checking for when choosing crowns or seed in the first place.
Pros and Cons of Growing Asparagus at Home
| Pros | Cons |
|---|---|
| Produces for 15 to 20 years from one planting | Requires two to three years before full harvest |
| Among the first fresh vegetables available each spring | Needs a permanent, dedicated bed location |
| Low maintenance once established | Slow to establish from seed |
| Naturally pest-resistant compared to many vegetables | Poor drainage can quickly kill crowns |
Expert Tips for a Long-Lived Asparagus Bed
A handful of habits separate a thriving twenty-year asparagus bed from one that fizzles out early:
- Mulch heavily in fall after the ferns die back, both to insulate the crowns and to suppress weeds come spring.
- Avoid planting asparagus in soil that previously grew asparagus, since replant disease can build up in the ground over time.
- Choose all-male hybrid varieties if minimizing volunteer seedlings from berries matters to your garden layout.
- Resist over-harvesting in the early years even when the bed looks like it’s producing well, since long-term yield depends on those first couple of seasons of restraint.
- Side-dress with compost annually rather than relying only on synthetic fertilizer, since asparagus responds well to organic matter worked into the soil each season.
Frequently Asked Questions
How long does it take for asparagus to grow after planting?
Crown-planted asparagus usually needs two to three years before a full harvest, while seed-started asparagus takes an additional year on top of that. The wait is the tradeoff for a bed that then produces reliably for well over a decade.
Can asparagus grow back every year on its own?
Yes, that’s exactly what makes it different from most garden vegetables. As a perennial, the same crown sends up new spears every spring for fifteen to twenty years or more without needing to be replanted.
Why are my asparagus spears thin instead of thick?
Thin spears usually point to a crown that’s either too young, over-harvested in previous seasons, or growing in soil that’s lacking nutrients. Reducing how long you harvest each season and adding compost in fall often thickens spears within a year or two.
Is it better to grow asparagus from crowns or seed?
Crowns are faster and more forgiving for beginners, cutting roughly a year off the wait before harvest. Seed costs less and offers more variety choices, but it demands more patience and a longer indoor start before transplanting.
Do asparagus plants need male and female varieties to produce?
No, and in fact most home gardeners prefer all-male hybrid varieties since they don’t waste energy producing berries and seeds. Male plants generally yield thicker, more uniform spears than open-pollinated varieties that include both sexes.
Final Notes
Growing asparagus rewards patience more than almost any other vegetable in a home garden. Get the site, soil, and planting method right at the start, hold off on harvesting too soon, and the same bed will keep feeding you fresh spears every spring for decades.
This article is intended for general informational purposes only and isn’t a substitute for professional horticultural or agricultural advice. For guidance specific to your soil, climate zone, or local growing conditions, consider consulting a local extension office or gardening professional.

