

You’re halfway through refinishing an old oak dresser. You’ve stripped the paint, and the wood looks rough and uneven. You reach into your toolbox and grab a sheet of sandpaper — but then it hits you. Which grit do you actually need right now?
It’s one of those questions that trips up beginners and even experienced DIYers. Sandpaper looks simple, but choosing the wrong grit can ruin a surface, waste hours of work, or leave scratches you can’t buff out.
That’s exactly why a sandpaper grit chart from coarse to fine is one of the most useful references you can have in your workshop.
In this guide, you’ll learn what grit numbers mean, how the grading systems work, which grit to use for every stage of a project, and how to avoid the most common sandpaper mistakes. Whether you’re working on wood, metal, drywall, or automotive finishes, this article has you covered.
What Is Sandpaper Grit?
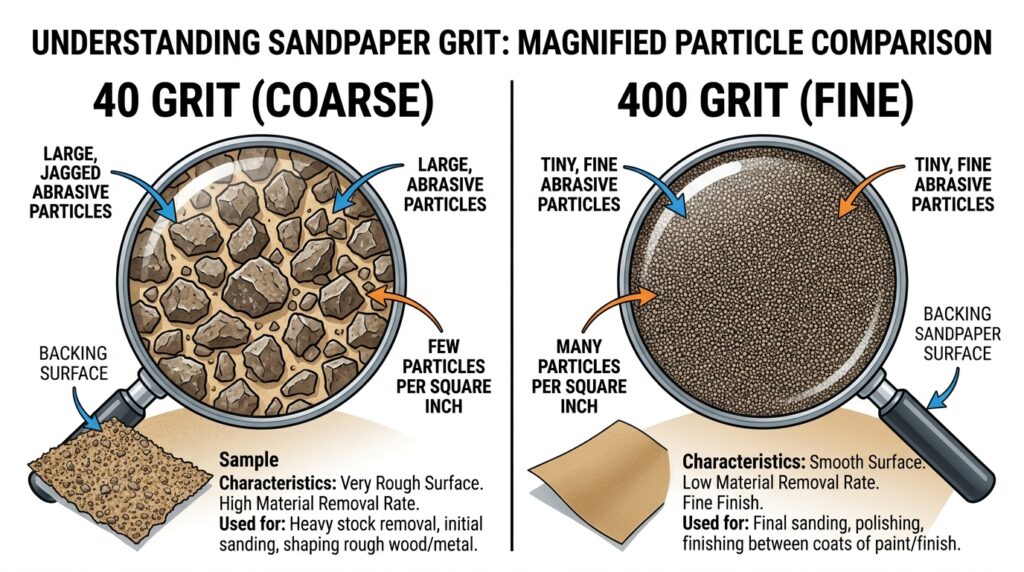
Grit refers to the number of abrasive particles per square inch on a sheet of sandpaper. The lower the grit number, the larger and fewer the particles — which means the sandpaper is coarser and removes more material. The higher the grit number, the smaller and more densely packed the particles, making the paper finer and smoother.
Think of it like this: coarse grit is a bulldozer, and fine grit is a finishing trowel. You need both at different stages.
According to the Coated Abrasives Manufacturers’ Institute (CAMI), sandpaper grits in North America are standardized using a numerical scale that helps manufacturers and consumers compare products accurately. There’s also a parallel system called FEPA (Federation of European Producers of Abrasives), which uses a “P” prefix (like P120) and is common on imported sandpaper.
CAMI vs. FEPA: The Two Grit Standards
Before diving into the chart, it’s worth knowing that two main grading systems exist:
| Standard | Origin | Example | Common Use |
|---|---|---|---|
| CAMI | North America | 120 | Most hardware store sandpaper |
| FEPA | Europe/International | P120 | Power tool abrasives, imported paper |
At lower grits (40–100), CAMI and FEPA numbers are nearly identical. At higher grits (above 150), FEPA grades become slightly finer. For example, FEPA P220 is roughly equivalent to CAMI 180. Always check the label when buying sandpaper, especially for fine finishing work.
For a technical breakdown of both systems, 3M’s abrasive product guide is an excellent reference.
The Complete Sandpaper Grit Chart (Coarse to Fine)
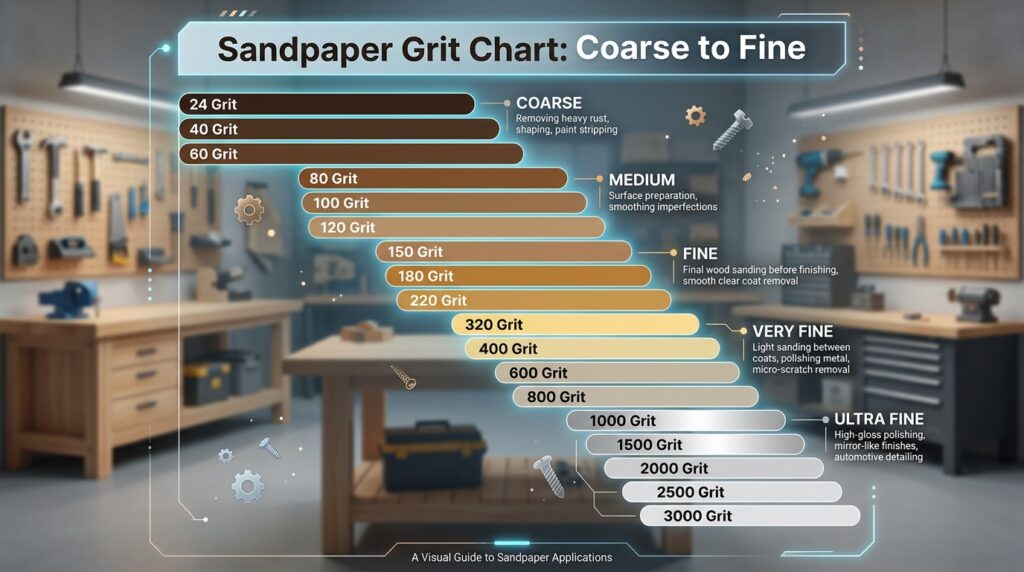
Here’s the full sandpaper grit chart, organized from the roughest to the finest:
Extra Coarse (24–36 Grit)
| Grit | Type | Best Uses |
|---|---|---|
| 24 | Extra Coarse | Stripping heavy paint, rust removal |
| 36 | Extra Coarse | Shaping rough lumber, removing old flooring |
Extra coarse grits are the heavy artillery of sandpaper. Use them only when you need to remove a lot of material fast — stripping multiple layers of old paint, leveling badly warped wood, or cleaning rust off metal. They leave deep scratches that must be worked out with finer grits later.
Coarse (40–60 Grit)
| Grit | Type | Best Uses |
|---|---|---|
| 40 | Coarse | Initial shaping, rough stock removal |
| 60 | Coarse | Stripping finishes, grinding welds |
Coarse grit is your starting point for most heavy woodworking. If you’re sanding reclaimed wood, grinding down a high spot in a floor, or removing old varnish, 40–60 grit does the job quickly. Just don’t stop here — these grits leave scratches that need progressive smoothing.
Medium (80–120 Grit)
| Grit | Type | Best Uses |
|---|---|---|
| 80 | Medium | Removing coarse scratches, prepping raw wood |
| 100 | Medium | General wood sanding, removing old stain |
| 120 | Medium | Intermediate smoothing, between-coat sanding |
Medium grit is where most woodworking projects spend the most time. After using a coarse grit, you’ll move through this range to smooth out scratches and prepare the surface for finishing. This Old House recommends starting with 80 grit on bare wood and working up progressively.
Fine (150–180 Grit)
| Grit | Type | Best Uses |
|---|---|---|
| 150 | Fine | Pre-finish sanding, smoothing raised grain |
| 180 | Fine | Final sanding before stain or primer |
Fine grit is where surfaces start looking and feeling truly smooth. At 150–180 grit, you’re removing the scratches left by medium grits and preparing wood to accept stain, primer, or paint evenly. This is also the stage where raising the grain becomes important — lightly wetting the wood before final sanding helps you sand down any fibers that lift when the finish is applied.
Very Fine (220–240 Grit)
| Grit | Type | Best Uses |
|---|---|---|
| 220 | Very Fine | Between finish coats, smoothing dried primer |
| 240 | Very Fine | Light scuffing of painted surfaces |
220 grit is arguably the most versatile grit in any workshop. It’s ideal for sanding between coats of paint, varnish, or lacquer to knock down any dust nibs or brush marks before applying the next coat. Many professional painters use 220 grit as their go-to between-coat abrasive.
Extra Fine (280–320 Grit)
| Grit | Type | Best Uses |
|---|---|---|
| 280 | Extra Fine | Wet sanding, smoothing finish coats |
| 320 | Extra Fine | Furniture finishing, automotive primer |
At this level, you’re doing precision finish work. Extra fine grits are often used wet — with water or a lubricant — to prevent clogging and produce a silky-smooth surface. Wet sanding at 320 grit before applying a final top coat is a technique widely used in furniture making and automotive refinishing.
Super Fine (360–600 Grit)
| Grit | Type | Best Uses |
|---|---|---|
| 360 | Super Fine | Final finish sanding, buffing lacquer |
| 400 | Super Fine | Wet sanding clear coats, metal polishing |
| 600 | Super Fine | Automotive paint correction, pre-polishing |
Super fine grits are used for polishing and finishing rather than material removal. At 400–600 grit, you’re essentially polishing the surface smooth. These are standard grits in automotive detailing and high-end furniture finishing.
Ultra Fine (800–3000+ Grit)
| Grit | Type | Best Uses |
|---|---|---|
| 800 | Ultra Fine | Automotive paint wet sanding |
| 1000 | Ultra Fine | Removing light paint scratches |
| 1500 | Ultra Fine | Pre-buffing paint correction |
| 2000 | Ultra Fine | Compounding before polishing |
| 3000+ | Micro Fine | Final paint polishing, optical surfaces |
Ultra fine grits are mostly the domain of automotive work, luthiery (guitar making), knife sharpening, and any task requiring a mirror-like finish. At 2000–3000 grit, the surface you’re working on can literally begin to reflect light. Products like Mirka’s Abralon wet sanding discs are popular at these ultra-fine levels.
Which Sandpaper Grit Should You Use? (By Project)
Knowing the chart is one thing — knowing when to use each grit is another. Here’s a quick reference by common project type:
Wood Projects
- Rough lumber / reclaimed wood: Start at 40–60 grit
- New raw wood: Start at 80–100 grit
- Before staining: Finish at 150–180 grit
- Between paint coats: 220 grit
- Final clear coat: 320–400 grit (wet)
Metal Projects
- Rust removal: 40–80 grit
- Smoothing welds: 80–120 grit
- Pre-paint metal prep: 150–220 grit
- Polishing metal: 400–800 grit and above
Drywall
- Skim coat leveling: 60–80 grit
- Final drywall smoothing: 100–120 grit
- Pre-paint: 120–150 grit
Automotive
- Stripping old paint: 80–120 grit
- Primer sanding: 180–220 grit
- Paint correction: 800–1500 grit (wet)
- Pre-polishing: 2000–3000 grit (wet)
The Golden Rule: Sand Progressively
One of the biggest mistakes beginners make is skipping grits. It’s tempting to jump from 80 straight to 220, but each grit leaves scratches that only the next grit up can effectively remove. Skipping steps means those scratches survive and show through your final finish.
The generally accepted rule, backed by woodworking authorities like Wood Magazine, is:
Never skip more than one grit level at a time when progressing from coarse to fine.
So if you start at 80, move to 120, then 150 or 180. Don’t jump from 80 to 220 unless you’re doing light touch-up work on an already-smooth surface.
Sandpaper Types: More Than Just Grit
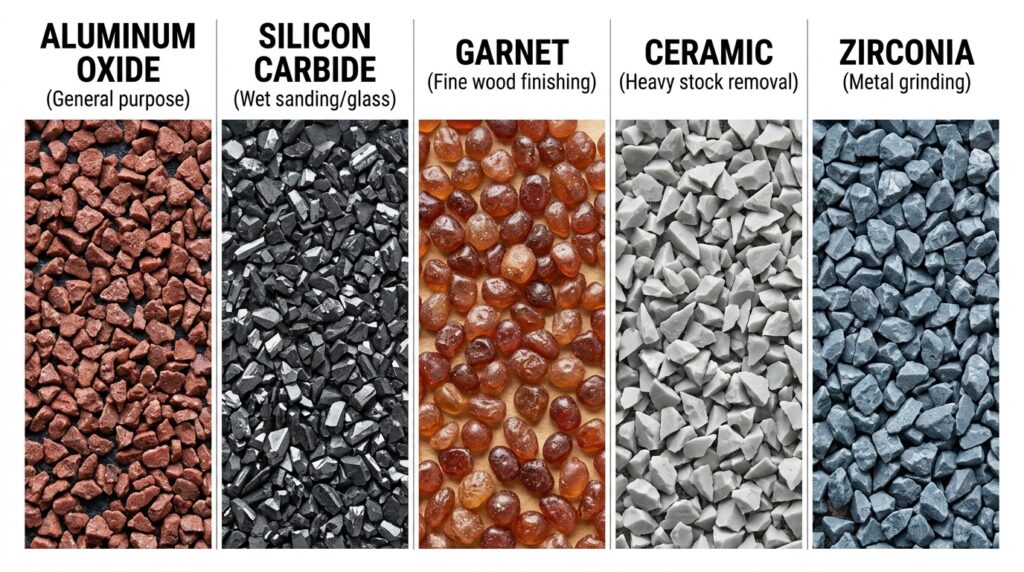
Grit is only half the story. The material the abrasive is made from also matters:
| Abrasive Material | Best For | Notes |
|---|---|---|
| Aluminum Oxide | Wood, metal, drywall | Most common, affordable, durable |
| Silicon Carbide | Wet sanding, metal, glass | Very hard, good for fine work |
| Garnet | Hand sanding wood | Natural, less durable, leaves fine finish |
| Ceramic | Heavy stock removal | Very aggressive and long-lasting |
| Zirconia Alumina | Metal grinding | Tough, for power tool use |
Rockler Woodworking and Hardware offers a detailed breakdown of abrasive types and their ideal applications.
Expert Tips for Better Sanding Results
These are the tips that separate a good finish from a great one:
1. Always sand with the grain on wood. Sanding against the grain creates cross-grain scratches that are extremely difficult to remove and become visible once stain is applied.
2. Use a sanding block for flat surfaces. Wrapping sandpaper around a sanding block keeps the abrasive flat and prevents you from rounding over edges unintentionally.
3. Clean the surface between grits. Coarse-grit dust trapped under your next sheet can cause scratches. Use a tack cloth or vacuum between grits.
4. Check your work with a raking light. Hold a light source at a low angle across the surface — this reveals scratches and low spots that are invisible under normal light.
5. Don’t press hard. Let the abrasive do the work. Pressing down hard causes uneven wear, loads up the paper faster, and creates heat that can damage finishes.
6. Replace sandpaper when it stops cutting. Worn sandpaper doesn’t sand smoothly — it burnishes the surface, making it harder for finishes to adhere properly.
Common Sandpaper Mistakes to Avoid
- Starting too fine: If you start at 150 grit on rough wood, you’ll spend forever getting nowhere. Match the starting grit to the surface condition.
- Stopping too coarse: Finishing at 120 grit before painting leaves scratches that telegraph through even multiple coats of paint.
- Ignoring the direction: Random orbital sanders minimize directional scratching, but hand sanding always goes with the grain.
- Using the same sheet too long: Clogged or worn sandpaper generates heat and smears material rather than cutting it.
- Wet sanding without lubricant: When using fine grits wet, always use water (or soapy water) as a lubricant to prevent loading and overheating.
FAQs: Sandpaper Grit Chart
1. What grit sandpaper should I start with for bare wood?
For most bare wood projects, 80–100 grit is the right starting point. If the wood is rough, warped, or has mill marks, start at 60 grit. For already-smooth or pre-finished surfaces, you can start at 120 or 150 grit.
2. What’s the difference between CAMI and FEPA grit ratings?
CAMI is the North American grading standard and uses plain numbers (80, 120, 220). FEPA is the European standard and uses a “P” prefix (P80, P120, P220). At low grits, they’re almost identical. At higher grits (above 150), FEPA paper is slightly finer than the same CAMI number.
3. What sandpaper grit should I use between coats of paint?
220 grit is the standard choice for sanding between coats of paint or varnish. It’s fine enough not to cut through the layer below but coarse enough to remove dust nibs and brush marks effectively.
4. Can I use sandpaper on metal?
Yes, but choose the right type. Silicon carbide or aluminum oxide sandpaper works well on metal. For rust removal, start at 40–80 grit. For polishing metal, work up through 220, 400, and even 600+ grit using wet sanding techniques.
5. What does “wet sanding” mean, and when should I do it?
Wet sanding means using water (or a soapy water solution) as a lubricant while sanding, usually at grits of 320 and above. The water prevents the fine abrasive from clogging and reduces heat. It’s standard practice in automotive paint correction and high-gloss furniture finishing. Learn more from wet sanding guide.
Conclusion
Understanding the sandpaper grit chart from coarse to fine is one of those foundational skills that makes every other project easier. Once you know what each grit does — and more importantly, what it can’t do — you’ll stop guessing and start making real progress on your projects.
The core takeaway is straightforward: start coarse enough to work efficiently, progress through each grit level without big jumps, and finish fine enough to get the surface quality your project demands.
Whether you’re refinishing a hardwood floor, prepping a car for repaint, or smoothing out a handmade cutting board, the right grit at the right time makes all the difference.
Ready to put this into practice? Pick up a variety pack of sandpaper that covers the full range — 60, 120, 180, 220, and 320 — and you’ll have everything you need for most projects. Brands like 3M, Norton Abrasives, and Mirka are trusted by professionals and are widely available at hardware stores.
Now grab that sandpaper, and go make something smooth.
