

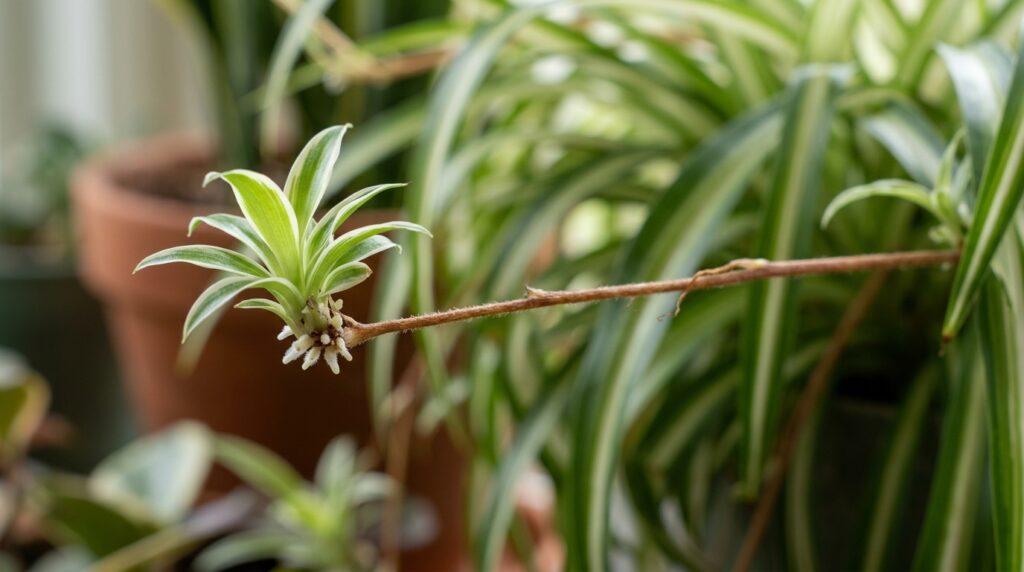
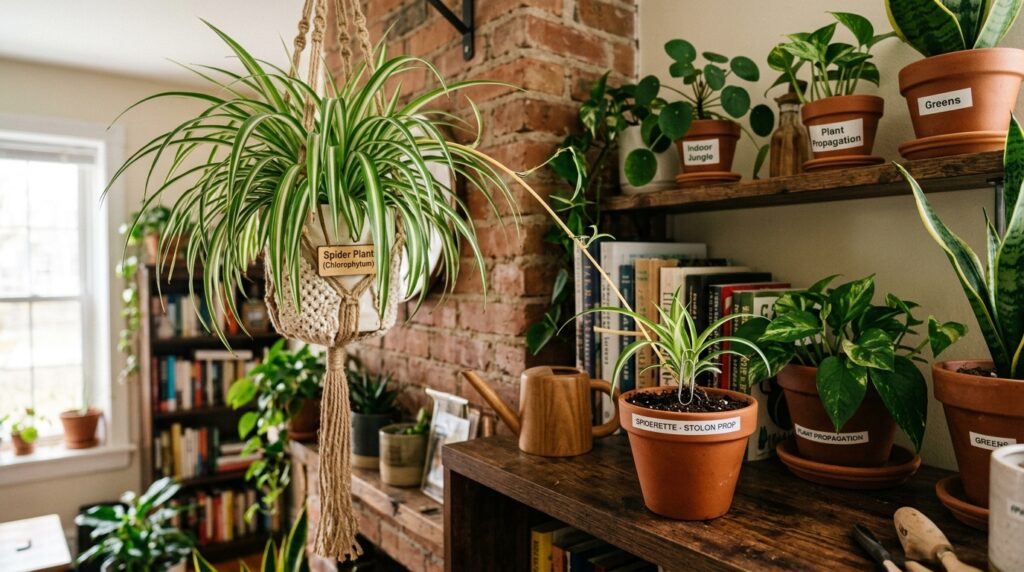
A spider plant rarely stays just one plant for long. Give it a little time, decent light, and it starts sending out these long, arching stems with tiny baby plants dangling off the ends — almost like it’s offering them to you.
If you’ve ever looked at one of those “spiderettes” and wondered, “Can I actually turn this into a new plant?” — the answer is yes, and it’s one of the easiest propagation projects in the houseplant world.
This guide walks you through every reliable way to propagate a spider plant, when to do it, what tools you need, and how to avoid the small mistakes that trip up beginners. By the end, you’ll have everything you need to turn one plant into a windowsill full of them.
What Is a Spider Plant (And Why Is It So Easy to Propagate)?
The spider plant, scientifically known as Chlorophytum comosum, is one of the most common houseplants in homes and offices, prized for its arching, ribbon-like leaves and its almost effortless growth habit. According to the North Carolina State Extension Gardener Plant Toolbox, the plant is native to tropical regions stretching from West Africa to South Africa, which explains why it tolerates such a wide range of indoor conditions.
What makes spider plants special for propagation is their natural reproductive strategy. Once a mature plant gets enough light, it sends out long stems called stolons, and at the tips of these stolons, baby plants called spiderettes (or “plantlets”) form. According to gardening experts, these spiderettes are essentially clones of the parent plant, complete with their own tiny root nubs ready to grow.
In other words, your spider plant is doing most of the propagation work for you. You just need to help the babies along.
When Is the Best Time to Propagate a Spider Plant?
Spider plants can technically be propagated year-round if you’re growing them indoors under stable conditions. However, the best results come during spring and summer, when the plant is actively growing.
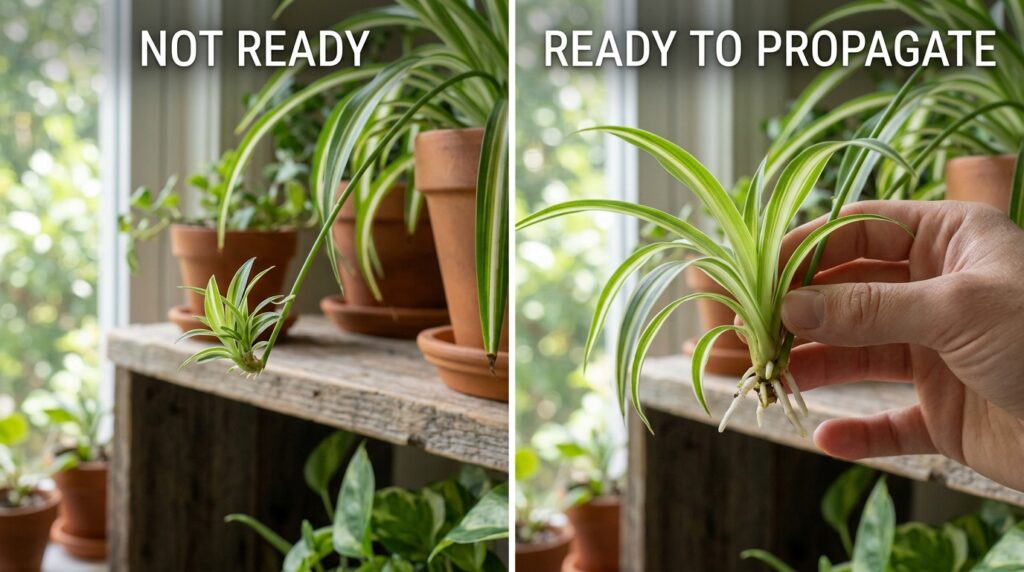
According to Linda Langelo, a horticulture specialist at Colorado State University, spider plants originate from a warm, humid climate in southern Africa, so they root fastest when temperatures are warm and growth is active. This is why most experienced growers wait until their spiderettes are at least 2–3 inches long with visible root nubs before attempting to separate them.
A few signs it’s the right time to propagate:
- The spiderette has at least one or two small white root bumps near its base
- The plantlet’s leaves are 2–3 inches long
- The mother plant looks healthy and isn’t stressed (no severe drooping or yellowing)
- It’s spring or summer, when growth naturally speeds up
If your spiderette doesn’t have visible roots yet, don’t rush it. Cutting too early just means a longer wait before it establishes in soil or water.
Tools and Materials You’ll Need
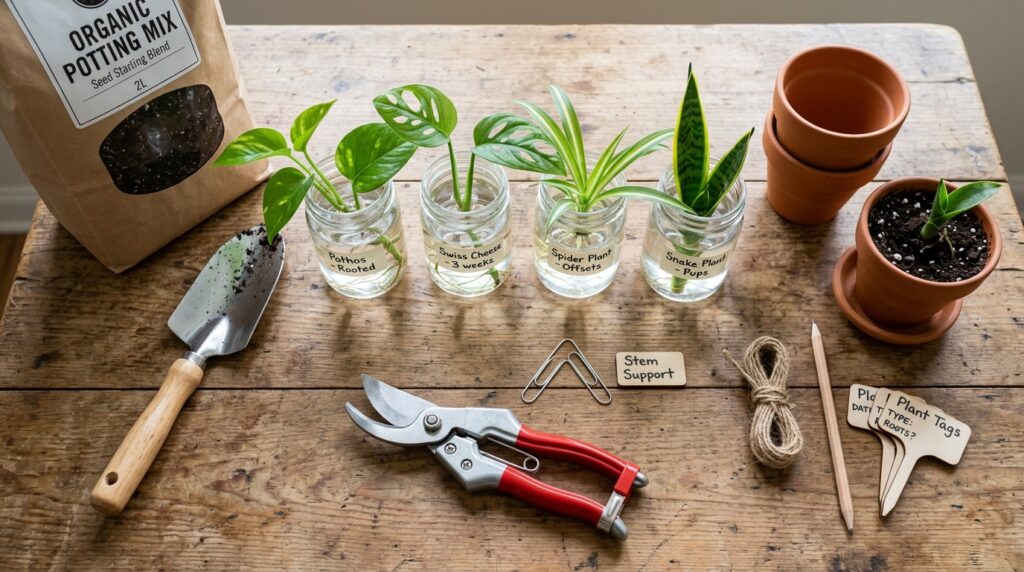
Before you start, gather a few basic supplies. Nothing here is expensive or hard to find.
| Item | Purpose |
|---|---|
| Clean, sharp pruning shears or scissors | Cutting the spiderette from the stolon cleanly |
| Small jars or glasses | Water propagation |
| Small pots (3–4 inch) | Soil propagation |
| Lightweight, well-draining potting mix | Rooting medium for the new plant |
| Bent paper clips or small stones (optional) | Pinning a plantlet to soil while attached to the mother plant |
| Filtered or distilled water (if possible) | Reduces leaf-tip burn from chlorine and fluoride |
The NC State Extension Plant Toolbox specifically notes that spider plants are sensitive to chlorine and fluoride in tap water, which can cause brown leaf tips. If your tap water is heavily treated, letting it sit out overnight before using it (or using filtered water) can help.
Method 1: How to Propagate a Spider Plant in Water
This is the most popular method for beginners because it lets you literally watch the roots grow — which is oddly satisfying and also reassuring if you’re nervous about whether the propagation is “working.”
Step-by-Step Instructions
- Identify a mature spiderette. Look for one with leaves around 2–3 inches long, ideally with small root nubs already visible.
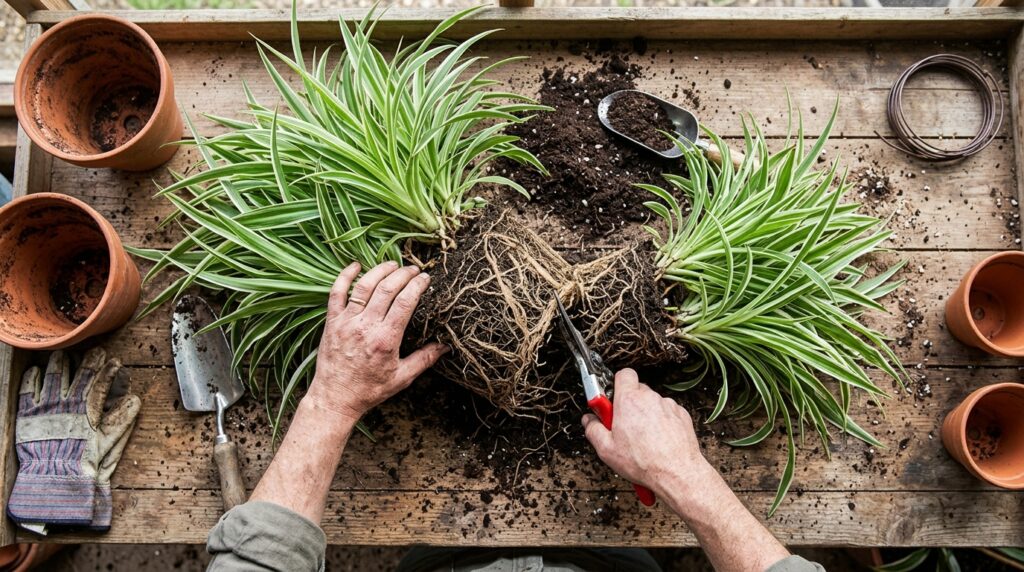
- Cut the plantlet from the stolon. Using clean, sterile pruning shears, snip the spiderette away from the stem. The recommended cutting point is below the roots or just beneath the leafy base where roots typically form.
- Trim the lower leaves. Remove any leaves at the base of the plantlet that would sit underwater — leaving them on can cause rot.
- Place it in a jar of water. Use a shallow container so the plantlet’s base sits in water without the whole thing tipping over or sinking.
- Set it in bright, indirect light. A windowsill that gets filtered sunlight works well. Avoid direct, harsh sun, which can scorch the leaves.
- Change the water every few days. This keeps it fresh and prevents algae or bacterial buildup.
- Wait for roots to reach 2–3 inches long, then transplant into soil.
Pros and Cons of Water Propagation
| Pros | Cons |
|---|---|
| Easy to monitor root growth visually | Roots grown in water tend to be more fragile |
| Great for beginners and kids | Transplant shock is more likely than with soil-rooted plants |
| Minimal equipment needed | Requires regular water changes |
According to the same source, the main downside is that water-grown roots tend to be weaker and don’t always adjust as smoothly when moved into soil — so be gentle during the transplant step.
Method 2: How to Propagate a Spider Plant Directly in Soil
If you’d rather skip the water step entirely, you can plant a spiderette straight into soil. This method tends to produce a stronger initial root system because the plant adapts to its final growing medium right away.
Step-by-Step Instructions
- Cut the spiderette from the stolon using the same clean-cut method described above.
- Fill a small pot (around 3–4 inches) with a lightweight, well-draining potting mix. Most general-purpose potting soils work fine — the South Dakota State University Extension notes that spider plants aren’t fussy about soil type.
- Make a small hole in the center of the soil and gently place the base of the plantlet into it, burying just the bottom portion (where roots are forming).
- Press soil gently around the base to hold it upright.
- Water lightly to settle the soil, then place the pot in bright, indirect light.
- Keep the soil consistently moist (not soggy) for the first few weeks while roots establish.
You can check for rooting progress after about two to three weeks by gently tugging the plantlet — if it resists, roots are forming.
Pros and Cons of Soil Propagation
| Pros | Cons |
|---|---|
| Stronger, more resilient root development | No visual feedback on root progress |
| No transplant shock later | Harder to tell if something’s going wrong early on |
| Plant adapts immediately to final medium | Requires more careful watering balance |
Method 3: Propagating While Still Attached to the Mother Plant
This is arguably the most reliable method, and it’s backed by university horticulture programs. Instead of cutting the spiderette first, you let it root while it’s still drawing nutrients from the parent plant — then separate it once it’s established.
According to a horticulture expert with the Ask Extension network, this approach simply involves pinning the spiderette into a nearby pot of soil while it remains connected to the mother plant, and then cutting it free once it has developed a good root system on its own.
Step-by-Step Instructions
- Place a small pot of moist potting soil next to or below the mother plant, close enough that the spiderette can reach it without straining the stolon.
- Rest the spiderette on top of the soil, with its base making good contact with the surface.
- Pin it down using a bent paper clip, a small stone, or a hairpin — anything that holds the plantlet snugly against the soil without crushing it.
- Keep the soil consistently moist while the plantlet roots.
- Wait 2–4 weeks, checking periodically for resistance when you gently tug the plantlet — that resistance means roots have formed.
- Once rooted, cut the stolon connecting the new plant to the mother, leaving the new plant independent in its own pot.
Why This Method Often Works Best
While the stolon is still intact, the plantlet continues drawing water and nutrients from the parent plant, giving it a head start before it’s on its own. This reduces the stress of the transition and often results in faster, sturdier establishment compared to cutting first and rooting afterward.
| Pros | Cons |
|---|---|
| Highest success rate; plantlet has a “safety net” | Requires more space (mother plant + new pot side by side) |
| Less transplant shock | Takes longer overall due to the waiting period |
| Strongest root development before separation | Less visual drama — harder to “see” progress |
Method 4: Propagation by Division
If your spider plant has grown large and root-bound, with multiple separate clumps or “crowns” of leaves growing from the same root mass, division is a great option. Instead of working with a tiny spiderette, you’re splitting an already-mature plant into two or more independent plants.
When to Use Division
Division makes the most sense when:
- You’re already repotting a large spider plant (since the roots have filled the pot to bursting)
- The plant has multiple distinct rosettes of leaves growing from one base
- You want a faster route to a mature-looking plant, since divisions skip the months-long maturation period that spiderettes need
Step-by-Step Instructions
- Remove the plant from its pot carefully, loosening the root ball with your hands.
- Identify natural divisions — look for separate crowns of leaves with their own root systems attached.
- Use a sharp, clean knife or pruning shears to separate the sections, making sure each division retains at least one leaf cluster and a portion of healthy roots.
- Plant each division in its own pot filled with moist, well-draining potting mix.
- Water thoroughly and place in a warm, bright (but indirect) location.
- Keep soil consistently moist for the first couple of weeks while the divisions settle in.
Pros and Cons of Division
| Pros | Cons |
|---|---|
| Produces mature-looking plants immediately | Can stress the parent plant temporarily |
| Maintains exact genetic traits (variegation, growth habit) | Requires a larger, established plant to start with |
| Faster than waiting for spiderettes to mature | Needs a sharp tool and a bit more confidence |
Method 5: The Damp Paper Towel Method
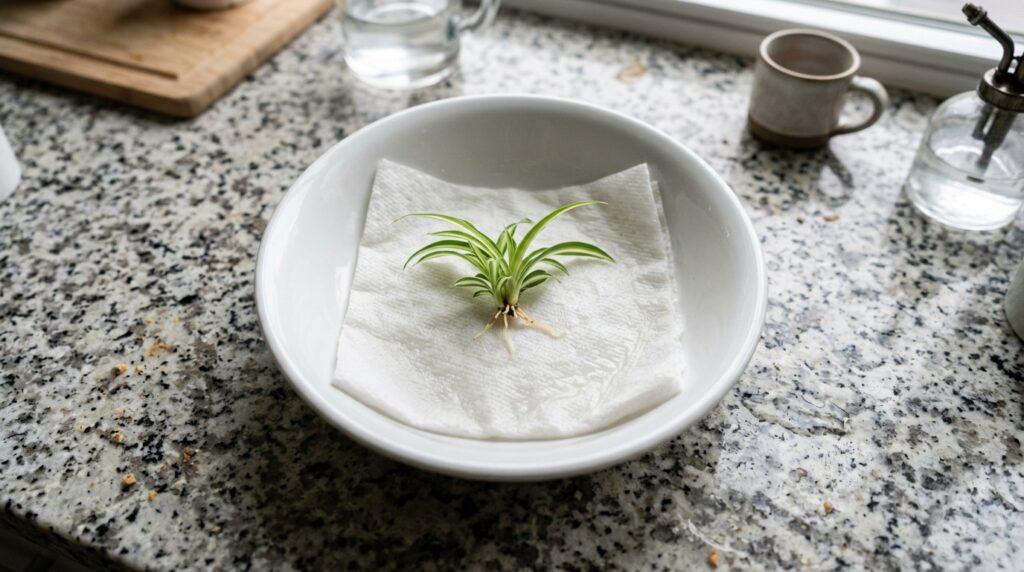
This is a lesser-known but genuinely useful technique, especially if you want to start several spiderettes at once without dedicating jars or pots to each one right away.
According to Melinda Myers, a gardening expert and host of the Great Courses’ “How to Grow Anything” series, the key requirement for this method is that the paper towel stays damp at all times — if it dries out, the rooting process stalls.
Step-by-Step Instructions
- Cut the spiderette from the stolon as you would for water or soil propagation.
- Dampen a paper towel thoroughly with water.
- Lay the spiderette on the damp paper towel, with the base (where roots will form) in contact with the moisture.
- Fold or wrap the towel loosely around the base, or place it in a shallow bowl to help retain moisture.
- Check daily and re-dampen the towel as needed — it should never fully dry out.
- Once roots appear (usually within 1–2 weeks), transplant the plantlet into soil.
This method is handy if you’re propagating several plantlets at once, want to give some away to friends, or simply don’t have enough jars and pots ready yet.
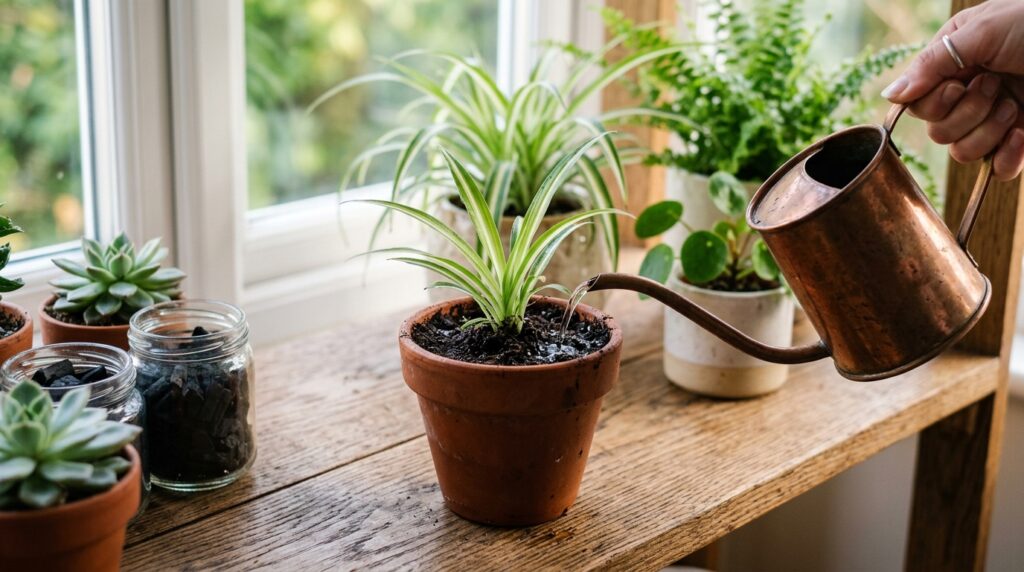
Aftercare: Helping Your New Spider Plant Thrive
Once your new spider plant has roots and is settled into its pot, the real work shifts from propagation to care. The good news is that spider plants are famously forgiving.
Light
Spider plants prefer bright, indirect light. According to the NC State Extension Plant Toolbox, the plant is intolerant of direct sunlight, which can scorch its leaves, but it can also tolerate fairly deep shade — though growth will slow down significantly in low light.
Watering
Water your spider plant about once a week, letting the soil dry out somewhat between waterings, according to SDSU Extension. Overwatering is one of the most common causes of problems, since soggy soil can lead to root rot.
Soil and Repotting
A general-purpose, well-draining potting mix works well. Spider plants actually like being slightly root-bound — in fact, SDSU Extension notes that being root-bound tends to encourage the plant to produce more plantlets. Just don’t let it go so long that the roots crack the pot.
Temperature and Humidity
Ideal daytime temperatures are between 65–75°F, with slightly cooler nights around 50–55°F, per SDSU Extension guidelines. Average household humidity is generally fine, though misting occasionally during dry winter months can help.
Fertilizing
Go light on fertilizer. NC State Extension specifically warns that over-fertilizing reduces plantlet production — so if your goal is more babies to propagate, less feeding is actually better. SDSU Extension recommends fertilizing only every three to four months, and waiting four to six months before feeding a newly potted plant at all.
Common Propagation Problems and How to Fix Them
Even with such an easy-going plant, things can occasionally go sideways. Here’s a quick troubleshooting reference.
| Problem | Likely Cause | Fix |
|---|---|---|
| Spiderette turns yellow or mushy after cutting | Rot from leaves sitting in water/soil | Trim affected leaves before propagating; avoid submerging foliage |
| No roots forming after weeks | Plantlet was cut too early (no root nubs) | Wait for visible root nubs before cutting next time |
| Brown leaf tips on new growth | Chlorine/fluoride in tap water | Use filtered or distilled water, or let tap water sit out overnight |
| Plant not producing spiderettes | Too much fertilizer, or insufficient light/dark cycle | Reduce fertilizing; ensure the plant gets short days and long uninterrupted nights to trigger blooming |
| Wilting after transplant | Transplant shock, especially from water to soil | Keep soil consistently moist for the first 1–2 weeks; avoid direct sun during recovery |
On that last point about flowering: the NC State Extension Toolbox notes that stolons and plantlets are light-dependent and tend to develop when the plant experiences short days and long, uninterrupted nights — less than 12 hours of light a day — for an extended period. If your plant isn’t producing many babies, this seasonal light cycle could be a factor.
Are Spider Plants Good for Air Quality?
You may have heard that spider plants are an “air-purifying” superstar, largely thanks to a famous NASA study from the 1980s. It’s worth understanding what that study actually showed — and what it didn’t.
In preliminary NASA testing, spider plants performed impressively in sealed laboratory chambers, removing a high percentage of formaldehyde from a sealed Plexiglas chamber within 24 hours. This research, conducted by NASA scientist Bill Wolverton, became widely cited as proof that houseplants clean indoor air.
However, more recent reviews have added important context. As one detailed breakdown explains, the study was conducted in small, sealed chamber environments — nothing close to a real, ventilated home — and independent reviews have found that in practice, plants remove airborne pollutants far too slowly to meaningfully impact air quality in a normal living space. Simply opening a window does more for indoor air quality than any practical number of houseplants.
So, should that change your mind about growing spider plants? Not really. They’re still:
- Easy to grow and propagate
- Visually appealing, especially in hanging baskets
- A low-maintenance way to add greenery to your space
Just don’t expect them to replace your air purifier or HVAC ventilation — think of them as a nice bonus, not a primary air-quality solution.
Are Spider Plants Safe for Pets?
If you have cats or dogs, you’ll be glad to know that spider plants are one of the safer houseplants to keep around.
According to the ASPCA, spider plants are classified as non-toxic to both cats and dogs. The ASPCA Animal Poison Control Center has confirmed that spider plants don’t contain toxic compounds harmful to pets — though Dr. Tina Wismer, the center’s senior director of toxicology, notes that pets who chew on large amounts of any plant material may still experience mild vomiting or stomach upset, simply from the fiber and texture, not from any toxin.
Interestingly, cats seem to be especially drawn to spider plants — likely because the long, swaying leaves resemble prey movement, making them irresistible to swat at and chew. If your cat treats your propagated spiderettes like toys, that’s normal behavior, not a sign of danger — just maybe keep new cuttings somewhere your cat can’t immediately turn into a snack while they’re trying to root.
Expert Tips for Propagation Success
Drawing from horticulture extension recommendations and experienced growers, here are a few extra tips that make a real difference:
- Don’t rush the cut. Wait until you see visible root nubs on the spiderette — extension experts consistently note that plantlets with established roots transition far more successfully.
- Use sterile tools. A quick wipe of your shears with rubbing alcohol between cuts helps prevent spreading any fungal or bacterial issues between plants.
- Match your propagation method to your goals. Water propagation is great for visual learners and beginners; the “attached” method gives the highest success rate; division is best when you’re already repotting a large plant.
- Hold off on fertilizer for new transplants. Give a newly potted spiderette four to six months before introducing fertilizer, as recommended by SDSU Extension.
- Watch the light cycle if you want more babies. Since plantlet formation is tied to day length, placing your mature plant somewhere it experiences natural seasonal light changes (rather than constant artificial light) can encourage more spiderette production.
Frequently Asked Questions
1. How long does it take for a spider plant cutting to root?
In water or on a damp paper towel, you’ll typically see initial roots within 1–2 weeks, with roots reaching transplant-ready length (2–3 inches) within 3–4 weeks. Soil propagation and the “still attached” method may take slightly longer — generally 2–4 weeks — since you won’t see visible progress until you gently check for resistance.
2. Can I propagate a spider plant from a leaf cutting?
No. Unlike succulents, spider plants don’t reliably propagate from individual leaf cuttings. Instead, they rely on spiderettes (plantlets) that form naturally on stolons, or through division of an established plant’s root mass.
3. Why isn’t my spider plant producing any babies (spiderettes)?
This is usually related to light cycles, fertilizing, or maturity. According to NC State Extension, plantlet formation is triggered by short days and long, uninterrupted nights, and over-fertilizing can suppress it. Also, very young plants (under a year old) often haven’t matured enough to flower and produce spiderettes yet.
4. Do I need to cut the spiderette before it has roots?
It’s better not to. While you technically can root a spiderette with no visible roots, success rates and speed improve significantly if you wait until you see small white root nubs at its base before separating it from the mother plant.
5. Is it better to propagate in water or directly in soil?
Both work well, but each has trade-offs. Water propagation lets you monitor root growth visually and is great for beginners, but roots grown in water can be more fragile during transplanting. Soil propagation skips that transition entirely and tends to produce sturdier roots from the start, though you won’t get the same visual feedback along the way.
Final Thoughts
Propagating a spider plant is about as forgiving as houseplant projects get — which is exactly why it’s such a popular starting point for beginners. Whether you choose water, soil, division, or the paper towel trick, the core principle stays the same: give the plantlet a little patience, consistent moisture, and bright indirect light, and it’ll do the rest.
If you’ve got a mature spider plant sitting somewhere covered in spiderettes, now’s a great time to start. Pick one method from this guide, snip off a healthy plantlet, and give it a few weeks. Before long, you’ll have a whole new plant — and probably enough extras to share with a friend or two.
Got a spider plant with babies ready to go? Try one of these methods this week and watch how quickly it takes off.
